Showing posts with label Display. Show all posts

Wednesday, 19 April 2017

CD Shelf - A music archive

I love music, my main collection is in  the form of the Compact Disc. CD's are a format that I have grown up with and that suits my needs. I love the feeling of purchasing a new CD and opening it, playing the music, and experiencing the artwork and sometimes lyrics inside that comes with my purchase.

My first ever CD purchase was from the video store in Picton, I was browsing their small collection and saw an album I would likely never see again: 'Primary' by 'Rubicon'. A band from Auckland that found a small amount of popularity in the early 00's due to a song called 'Bruce'. I had to have it, even just to say that I was one of the few people in the country/world to have it.

Some of my collection is from compiling full discographies of an artist as I have done with Shihad, The Datsuns, and Alice In Chains. My CD collection is mostly of Kiwi and Rock music, with a few exceptions, sometimes when browsing a CD store I will see something different that I buy purely out of curiosity, and that purchase sometimes becomes a favourite, like Chirs Jasper's 'Superbad' album.
Iron Cactus shaped CD rack
Flimsy CD rack


My organization of the physical CD's has always been done using CD racks, the CD rack has been my chosen piece of display furniture as it enables many CDs to be stored in one place and is easy to access. Sometimes however, CD's fall from the rack, and make a mess, and it turns out they aren't they most space efficient. The two CD racks above are no longer in use as they are not very practical.

It was time to reorganize.

I decided to build a simple shelving unit specifically for the purpose of storing my CD's. I had some pieces of timber perfect for building such a shelf so I got to it. I measured the two side pieces and the back piece so they were the correct height, I then measured six shelves to be the same length as the width of the back piece. I screwed the sides to the back piece and then measured out the correct spacing between each shelf before screwing them together.
My new shelving unit made of recycled timber.
Now I could display more of my CD's in a smaller area (150 approx). Also this purpose built shelf allowed space for the CD's which were not standard size. e.g. the box for Korn's 'horrific little mutations'* album and the Supergroove box set of EP's.
Five empty shelves
I am very happy with this CD shelf. It suits its purpose extremely well and fits the look of my bedroom which is full of other handmade wooden furniture.

When it comes time for me to leave the flat that I am in, this shelf will be easy to move without having to remove the CD's, another convenience that will save time and energy.
The finished and full CD shelf next to my other CD rack.
I might need to make another of these shelves soon enough.


*The Korn album I am referring too is better known as 'untitled', named this way so that the listener could name it as they see fit.

Korn 'Untitled' or 'Horrific Little Mutations' or anything you want to call it.

Thursday, 21 April 2016

The Alleyway

One of my flatmates is brilliant at talking, he spins tales like intricate little webs with such a poker face that the truth is indistinguishable from a lie. One of these stories has earned him an association with the name 'The Alleyway'.

Adin-Jenks http://adin-jenks.deviantart.com/art/Alleyway-Stock-164030882
An Alleyway is a place that summons up all sorts of dark images of grime and criminal activity. Dodgy trade deals, violence, and drunken antics.

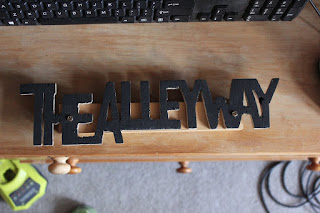
When we moved into the flat we jokingly said that we would get him a sign on his bedroom door that said 'The Alleyway' we teased him for a while about it before leaving it to rest a while. In the back of my mind I've been meaning to get on with making the sign and surprising him with it. Last week I finally got on with making the sign.

I sketched out a few diferent layouts on paper. I then grabbed a skinny piece of ply and sketched out the shape of the letters on the ply with Pencil. When the blocked shapes were perfect I drew over them in vivid marker to make it easy to see when I got to cutting the shape.

My workspace filled with tools


I readied the jigsaw, for such a small and intricate shape as a word I needed to turn the reciprocation speed down and ensure that I was using it on the correct setting that allows for curved cutting on wood. I then set to cutting out all of the negative spaces around the letters this was difficult at times. I struggled to clamp the ply in ways that would hold it firmly but allow my intricate maneuvers with the jigsaw. At times small pieces of ply would chip of and I would have to slow down, this tests ones nerves, any further damage would result in the shape being unusable.

First paint job
When the shape was finished I sanded it with my new toy, a 1/3 sheet sized electric finishing sander; this smoothed both main surfaces. I sanded the edges with scraps of sandpaper allowing my fingers to get in and sand the small grooves.

After the first paint job.


When the shape was done I imagined how it would look on the door. I decided to mount it on a larger piece of wood and also to paint it. I painted it black completely on both sides and the edges and then mounted it on the block of wood.

Initially I had planned to screw it to or hang it on the door but I decided instead to save the door and just duct tape it to the top of the door frame, this meant that no lasting damage would come to the door. Another project was achieved with a scrap of ply and a few hours of work.


The doorway
When my flatmate arrived home and noticed the sign above his door he was both impressed and pissed off at me. The sign is a reminder of his ability to spin believable tales from lies and also how some tales will stick and refuse to come off.
The Alleyway.

Wednesday, 6 April 2016

Our New Flat and the Dungeon.

Shellie and I and three other friends got together and decided we need to get a place to ourselves. We began the flat hunt. After a few good flat viewings, being disappointed when we missed out; and a few terrible flat viewings and counting our lucky stars that we can afford not to have to put up with that level of filth; we found a place in Wadestown on Weld St.
We spent an exhausting Saturday moving in and then over some celebratory beers we fittingly came up with a name for our house “The Forge”.

The forge is the perfect residence for us at this stage of our lives. Each of us has a large enough bedroom. There is enough parking space for our cars and the scooter. There is a space out the front of the house ideal for BBQ’s and sun bathing. The location in Wadestown is close enough to everything, plenty of fast food eateries, a dairy, a bus stop, a taxi stand, and only a five minute drive to the city. There are plenty of green spaces nearby including the Ahumairangi hill, perfect for weekend runs, and Trellisick Park, which has plenty of walking tracks and picnic spots.

The property also includes a space beneath the lounge which had been neglected and deemed a spot for rubbish storage. When I first saw this area of the house I was excited, I could make excellent use of such a space.
Halfway through sorting the junk and adding my own belongings
I spent the night of Wednesday cleaning out the space which has the flat has dubbed “the dungeon”. There were all sorts of lost treasures and junk buried in there. Old benchtops, doors, a bed base, pieces of a couch, a mirror, timber, shelves, a sink, a playstation, a creepy music box, gardening tools, a watering can, storage bins, the list goes on.
A creepy music box
A big mirror


The first thing I did was using a scrap of GIB clear away the masses of spider webs throughout the space. I stacked all of the wood in a corner, out of the way. I didn’t bother to remove the rubbish and other junk, but I did stack it neatly out of my way.

Accumulated cobwebs
Next I gave the place a good sweep. There was years of dust piled up across the floor, hidden within every nook and cranny, and throughout all of the shelves. I just swept it under the floorboards, as underneath is the ground; dust is dirt so to the dirt with the dust.
As the tidy up continued

All along the front wall of the dungeon is a huge display of shelves, these provide the perfect space to put all of my D.I.Y. bits and bobs, and things I usually put in the garage.
Storage and Workbench

The dungeon provides a space for my belongings which I don't mind getting dusty, this includes things like Outdoors equipment, ropes, tents etc.
The mountain of rubbish which previous tenants left behind.
As it is a long room it is ideal for small target practice. I have a toy BB gun and the space is ideal for shooting cans with the gun.

One of the flat mates  has a dart board which he has allowed to be setup in the dungeon. I measured up the hooks and then put a couple of nails into the wall studs. I hung it on the wall and it provides an excellent environment to practice accuracy with darts.
A beautiful piece of artwork.
A couple of things that I haven't gotten around to are fixing the air ventilation system which has been poorly attached and even more poorly duct taped. So with a friends help I'll do a better job of taping it.
Fantastic Ventilation; Yeah Right!
There are also a few wires that hang down from above my head that lead to the lights and other electrical outlets, I want these well away from my head space so that I don't pull them down, removing the light source in there or electrocuting me.
It's my space and I'll put what I want in it
Ultimately the dungeon is a space for me to play with my tools. I am always looking for projects to do with which I can use my tools, I stapled some pieces of cardboard to the wall so I could write up my upcoming projects and have them in front of me as a reminder. I have a few projects planned, so watch this space updates.

Tuesday, 9 February 2016

D.I.Y. Painting a Mural.

Shellie And I on holiday in the far north of NZ
In my first year at University I left home and moved in with my partner Shellie. We were soon told that a small two bedroom house could be our house while we study if we did the renovations; and so we did.
Myself painting the fine details.
Diamond the cat chilling against a pre painted house


When the uni holidays came about we set to work emptying the house of all furniture, old paintings, and other crap. We set to work sanding down all of the walls and rafters.
We painted the interior of the house a light grey; a change from the sour yellow it was.
All of the rafters were painted white. We then had a number of feature walls; in the main bedroom we put up red striped wallpaper, in the living area we painted a burnt orange and in the bathroom we painted sky blue. As well as this I decided I wanted to paint a mural.

Burnt Orange feature wall in the dining room
Red and grey striped wall paper feature
wall in the bedroom


Blue feature wall in the bathroom


I set to work measuring the front bathroom wall. This was the best spot for it as it doesn't initially stand out, yet as you sit on the loo you can contemplate the artwork. Next I designed a simple layered image of a rock concert out of various silhouettes I found online. I chose a colour scheme that stood out and I printed the image. That was the easy part.
My final design which combines several silhouettes in to a concert,
made using MS paint.
The idea was a performer and
a crowd with some crazy lights
emmiting from the guitar.


Next I set to work with a measuring tape measuring out all of the points on the image to the wall. I drew the entire image on the wall in pencil and then I put brush to wall and began to add colour.
We got creative with the paint
The blank wall


An attempted splice so you can see the whole wall
Masking tape to guide the purple lines


This corner detail shows that several layers of the yellow
was needed to be effective.


What happened over the next few weeks was an amazing transformation of lifeless wall space into a colourful static performance. Each night when I had a break from my studies I would paint a little. As more colour made its way onto the wall the mural came to life!

There are still parts of the mural which I'd like to touch up, for instance, the masking tape around the heater has been there for years now but I'm no rush to take it off; there's also a spot that doesn't line up perfectly but I'm probably the only one who notices it as I look at it each day.
Putting my feet up, it doesn't all have to be about work.
It has come to the stage where we are soon to move out of our little house on the hill, but no word has been said as to the fate of the mural. Fingers crossed it survives. I like to believe I've added value to the house rather than reduced value.

My completely imperfect Rockstar mural.

Wednesday, 2 September 2015

Making a Bookshelf out of scrap.

It feels like the Happy Valley Tip Shop is my second home recently. I love the place; there is so much cool stuff that has been salvaged from the landfill that they will give away for a couple of dollars. On my latest trip there I managed to purchase some recycled timber pieces I thought ideal to build a shelf out of.

Earlier this year, a generous Auntie needed to find a new home for her previously treasured Early Childhood Education (E.C.E.) books. They were offered to my partner Shellie as she is currently studying E.C.E. and so two big boxes of books ended up in our house taking up floor space.

The timber from the tip, as well as some leftover pieces of decking timber from around the property were the perfect materials to create some storage furniture for the books.
Decking timber from around the property, it is a bit green.
Timber from the tip shop.
The timber needed some prep work, cutting to the correct lengths and sanding down certain areas. The decking timber had previously been used as a deck and was replaced, the old stuff which I used had a tinge of green to it from twenty years of moisture and mould buildup. This was sanded off with a belt sander pretty easily.
RYOBI electric belt sander.
While I'm showing off tools, below are my RYOBI tools that I have purchased recently. They are a fairly expensive purchase, yet are hard wearing, and a long lasting investment.
Battery and charger.
The bag can holds some tools, I have four batteries, an impact driver, a jigsaw, a multi-tool, and a radio.
Also seen here are a sharp saw, and a measuring tape. Both essential to a handy-man's toolbox.
I began to cut the pieces to their correct lengths with saw. I follow the old adage that my dad has told me time and time again, "Measure twice, cut once".
The small pieces of decking timber will hold the sides together, and will have the shelves nailed to them.
The earmuffs and visor keep me safe from loud noises, from powertools, and even hammers. The visor protects my eyes and face from projectiles e.g. splinters.
Each of the two sides of the bookshelf were created by nailing joining three lengths of decking timber together as one solid piece.
The two bookshelf sides.
Two saw horses helped to stand the two sides up while I nailed the shelves to them.
How to join it all together.
Seen here is the final shelf. This was an easy project that took only a couple of hours. If you have a lot of belongings with nowhere to put them, or are striving for a tidier house, this is an easy piece that can serve your needs.
The finished shelf
Does it look like recycled timber? Yes. Does it serve its purpose? Yes. It does what we need it to, as students we are looking for practicality. We don't need to own expensive brands of furniture to give us a certain financial status, we are content with practicality. The aesthetic of the book shelf is simple, clean, and functional. There is some textural beauty in the corrugations of the decking timber. These were sanded with the belt sander, giving the tops of the corrugations a clean and not green, fresh timber look, but this is contrasted with the dips in the wood which still show the old, dark, weathered timber. These little details appeal to me. I find that recycling of materials into something practical is beautiful.
The book shelf is full.
There is one more thing I would like to do to this book shelf, in accordance with my manifesto, and that is to inscribe into the wood the origin of the materials, as far back as I know; and the processes that these materials undertook in becoming the bookshelf you see now.

The timber shelves would have a history to them, a past life, a purpose for which they were previously used for. As for the decking timber, it knows twenty years of family life; twenty summers of family BBQ's and childhood adventure; twenty winters of rain, wind, and sometimes snow. These stories are something I would like to celebrate in the creation of this book shelf. 

Job done. I no longer have education books all over the floor.