My fiance Shellie has an incredible passion for her job as an early childhood teacher, her area of expertise is the outdoors and how children interact with outdoor spaces.
She had an idea of creating a big barrel swing, and sourced a big blue barrel as a starting point.
Once brought home to the forge we took it into the workshop dungeon to carve with the Jigsaw. First we took one of the ends off, this created a space where the children could crawl into. We then cut a window into one of the curved edges of the barrel. This window allows the children to hang their legs out of the barrel, to see out of the barrel, or even climb through into the barrel, and allowed the children to create the swinging motion by pushing against the ground..
Shellie cutting the front window out of the swing.
The next step was to drill four holes into what would be the top of the swing, rope will be tied through these holes so it can be hung securely at the Early Childhood Centre.
We also drilled a couple of holes in the bottom for the purpose of drainage.
Once we were happy with the shape of the swing we had to soften the edges. We scraped off as much of the rough plasctic shards as we could and then tried to sand the edges which clogged the paper, the next trick we tried was melting the edges so they were flat; we used a small blowtorch and guided the flame across the plastic edges this worked well.
Once at the Centre we used rope to suspend the swing. Using knots that would not slip or come undone we tied the barrel to hooks which were screwed into the platform above.
The swing in place at the centre.
The general reaction from the children at the centre was excitement at the new interactive piece of playground equipment,
When we moved into our flat in Wadestown, Shellie and I claimed a large bedroom, the only problem was it didn't have any storage space. For the first while it was quite a mess. We moved a couple of shelving units into a spare bedroom down the hall and hung all of our clothing in a wardrobe down the hall that wasn't being used, this was less than ideal but worked nonetheless.
In the months following I came up with ideas on how to optimize the space in our bedroom and to contain our stuff. One of these ideas was to build a wardrobe that would live in our room and not down the hall.
Over the next few weeks I constructed a wardrobe that would fit our needs. It would be over 1 meter wide and tall enough to house two bars full of clothes.
I had the help of my friend Adam, and Shellie also helped out.
1900mm X 600mm.
One solid wall piece.
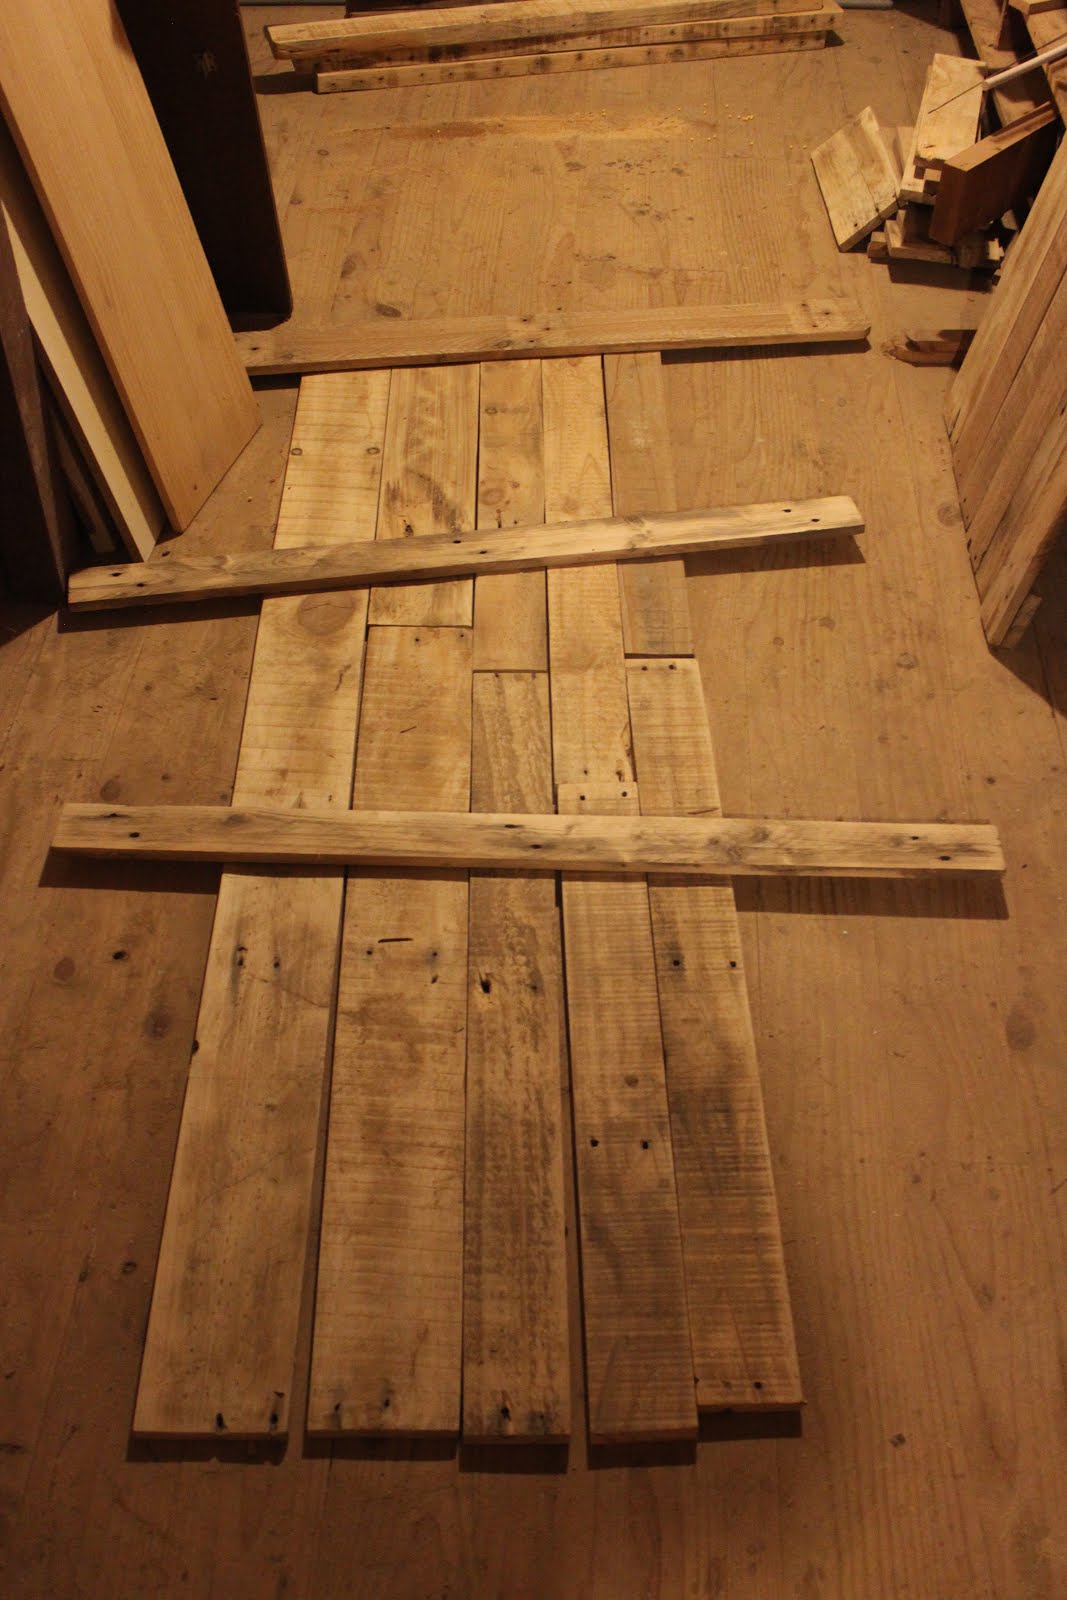
After completing construction of the guitar stand Adam and I set to work on creating the wardrobe walls. Using sanded down pallet wood we measured and cut the timber, laying it out so it was 1900mm tall and 600mm wide. We used five other pieces of timber to screw to the laid out pieces, thus forming one solid wall piece. This was harder than we initially assumed it would be as our pallet timber was imperfect, bowed slightly in places, and not all the same thickness, this meant an inventive and rough technique was needed to force the timber together in places before screwing it all together so that it aligned neatly.
Over the next few weeks I finished off the second wall; I cut in half a steel beam to create two smaller beams of even length; and I made both a top and bottom base which the two walls would sit in and be attached, this I achieved by nailing four 4X2 pieces together much the same way as I had for the guitar stand.
Before lining it all up I used my jigsaw to cut out gaps where the two beams could slot in; this was an error of judgement as I hadn't made an allowance for the top base which had an overhang that covered the gap. This cost me time in cutting a new piece of timber and a new gap.
Lining it all up
Top base overhanging the gap for the beam.
Before nailing the walls to the bases and constructing the wardrobe as a complete piece of furniture I needed to make it pretty and safe. A lot of the screws I had used were longer than the wood was thick so they stuck out dangerously. Being the safety buff as I am I needed to find a way to remove them. I called Adam over and he provided me with an angle grinder which he taught me how to use. The two of us took turns removing any sharps from the two walls, using the correct protective gear. Safety glasses for our eyes and earmuffs for our ears. The grinder is a dangerous tool and we had to clear the area from anything that could catch on fire from the sparks, a perk of having a friend who is a volunteer fire fighter in has spare time.
Adam taught me how to use the Angle Grinder
We removed sharps from the two walls.
We cleared the works bench of things that could catch on fire.
That evening I brought the pieces of wardrobe into the bedroom, I couldn't construct it elsewhere in the house as it wouldn't fit through the hallways very easily. Shellie helped to hold the walls steady while I nailed the pieces together. when the box was completed with the two bars inserted into their gaps I assessed the wardrobe, it had quite a bit of movement, so I cut and sanded down two braces to cross the back of the wardrobe, these stabilize the whole wardrobe, stopping excessive movement.
Shellie helped me by holding the walls still.
The two back braces stabilized the wardrobe.
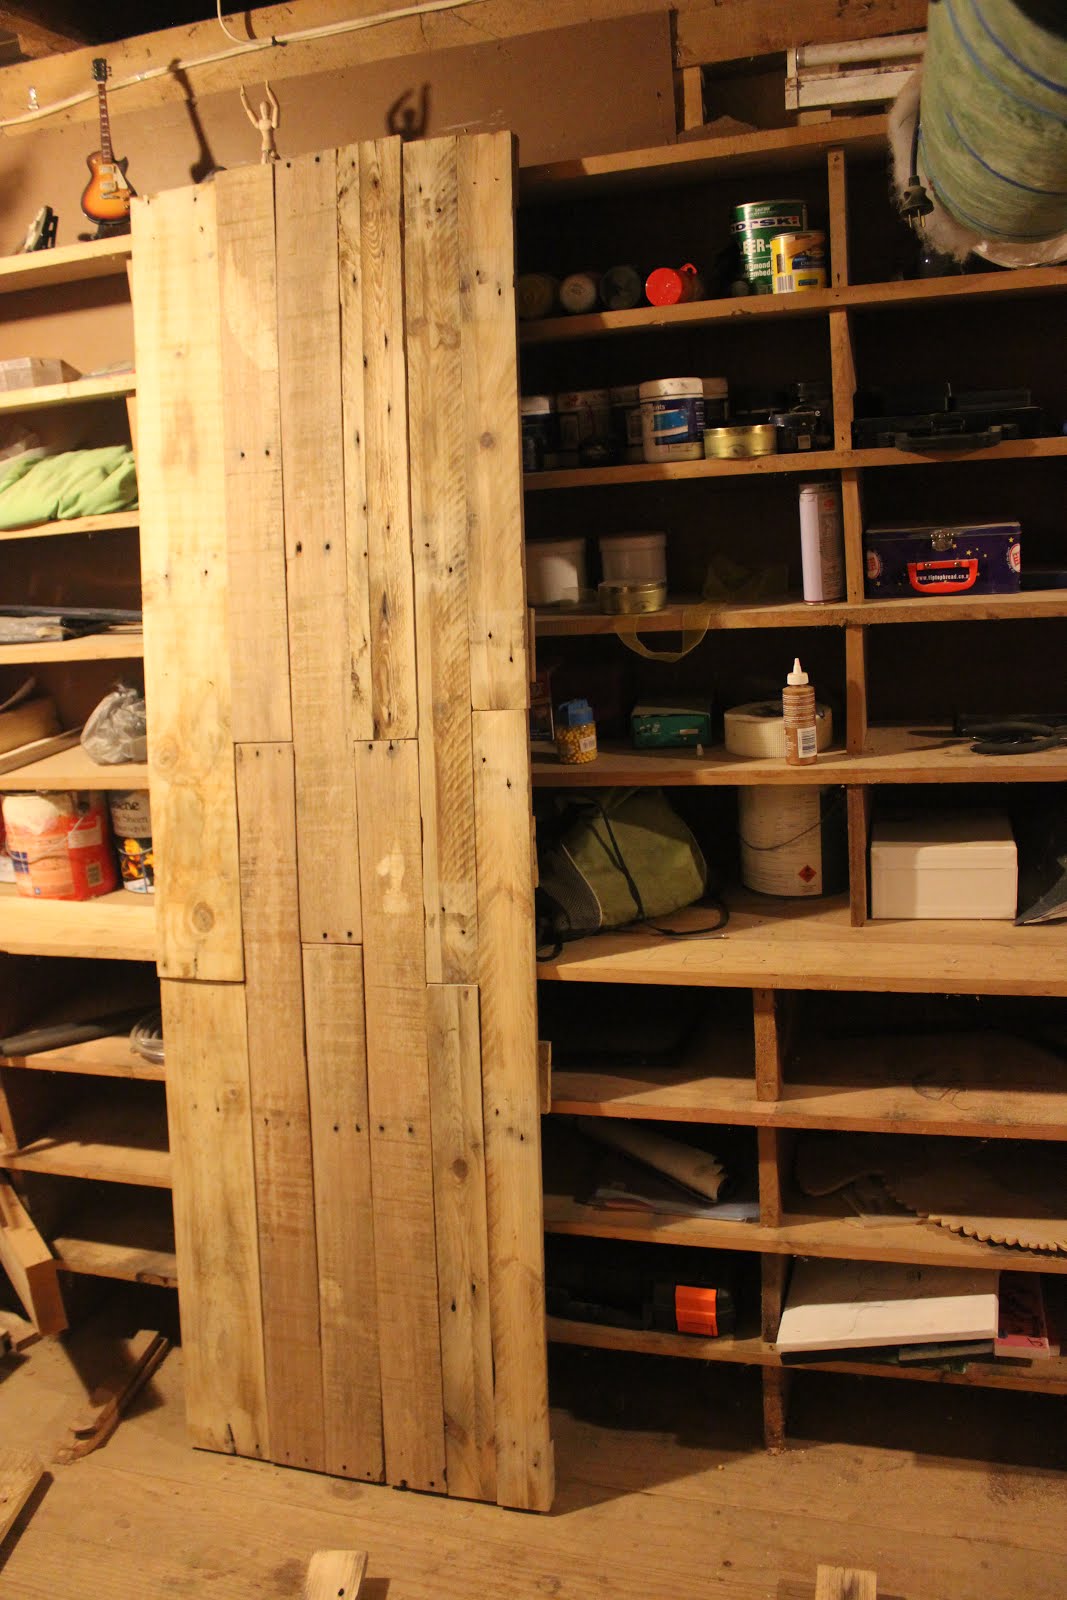
The finished wardrobe fit the corner of our room snugly. The next night I took delight in filling it with our clothes. Now we no longer have to walk the length of the house to pick out the next days clothes.
Our new wardrobe filled with clothes.
Creating a wardrobe from nothing but pallets was an exciting opportunity to learn some new D.I.Y. techniques, to learn how to use tools I haven't explored before, and to add another piece how furniture to our room that tells a meaningful story that purchasing an ugly plastic rack never could. By reworking old materials into something new I am adding my work and my daily life to the wardrobe. I am creating a new history for materials that already have a prior history, to me that is fascinating.
I don't know exactly where this timber came from originally but I can decide where it will end up after I am finished using it during my time flatting. Likely it will be used again as a wardrobe by someone else, taking with it the history of its creation and my use of it.
For years at my home and again at our flat I've had to slump my guitars in the corner of the room; this gets them out of the way which is good, but there are a couple of downsides to this method is storage, the first being it doesn't look very attractive; The other downside is that when I want to use a guitar I have to lift the other guitars out of the way and try not to clatter them around too much, I fear doing this scratches them and knocks them about which isn't too good for the acoustic guitars which already have a few bumps and scratches.
On my to do list was to create a guitar stand that could house my guitars. I had a source of timber from the pellets I had deconstructed and I began to draw up some plans.
Two small pieces of 4×2 for the base. On top of this will sit two larger pieces of 4×2, these will have the body of the guitar resting in them. Two pieces of 2×2 will stand vertical at the back of the base. One piece of timber will be a back support joining the two 2×2. Lastly six pegs will stick out from the top of the guitar stand to separate the guitars.
Construction started Saturday with Shellie and I building the base. Next we needed to attach he 2×2 but the timber we had was painted an awful blue, ideally the guitar stand will be the colour of natural timber. We decided that I would revisit it the next day.
Sunday a good friend of mine Adam came over, us boys took over my man cave and we set to work. I began to sand the blue paint away but it was taking too long without a belt sander. Adam suggested we try to use his little plane. He brought out the tiniest hand held plane I had ever seen and we took turns stripping the paint off with it. I tidied up the 2×2 by giving it a quick sand. We then proceeded to assemble the guitar stand. When it was time to attach the pegs I struggled to see that they would be sufficient, they appeared as more of an eyesore than anything else.
The scrapings of paint and timber it took off the wood.
The tiniest plane I have ever seen,
Having Adam there brought about many new ideas. The best being to replace the pegs with a piece of timber along he top which could then have five notches cut out of it for the guitar necks to rest in. We ended up attaching a peg at each end and then the timber on top. I then measured and drew on the notches and cut them out with my jigsaw.
I also decided that I would like a place to hang a ukulele. I found some dowel that could hold a uke; I used my drill to create some holes for the dowel, an appropriate space apart for a ukulele to hang, I squirted some glue in the holes and then pushed the dowels inside.
The guitar stand was complete. The next step was to put it in its place in the corner of the room and to decorate it with my guitars. It looked superb once in place. I am absolutely stoked with the way it turned out and I should have done it years ago. The guitar stand completely fills it's purpose, it looks beautiful with the natural wooden tones complementing the other wooden furniture in the room, and it prevents a mess of guitars from forming in the corner of the room.
To use recycled pellet wood to create a beautiful piece of furniture is a great feeling. I have created something out of recycled free timber which many people discard as dirty and worthless. This is what I live for, finding and creating beauty from nothing.
I'd always wanted to learn how to darn so having clothing that was falling apart on me was the perfect excuse to.
Like a lot of fabric crafts I have had this preconceived notion that darning was a female craft. Perhaps once upon a time the ladies would jump at the chance to sew, knit, or darn the clothing of men all around to show off their mad skills; maybe not, it is more likely this was a result of a tradition where men were bread winners and women stayed home and didn't spend money; how the times have changed! Nowadays the suggestion that the ladies should do it for you would likely earn you a slap.
In the process of darning.
As more rows are thread the jersey pulls together more easily.
One of my favourite woolen jerseys, a re-purposed school jersey had been looking a bit worse for wear. The sleeves had laddered considerably, and one of the cuffs was hanging by a couple of threads. The idea was to darn these parts of the sleeve to make the jersey look less scruffy, to save it from deteriorating further, and to keep my arms warm as intended.
To darn you need a length of wool, in this case mine is black to match the black wool of the jersey.
A large darning needle, big enough to thread the wool through, a big needle of around 100mm is a good length to use.
A lot of holes are made over joints such as elbows and ankles. For holes like this it is useful to use a cup or egg shape to shape the hole naturally.
The upside down cup is used to stretch the hole out into a natural position for darning.
Through the magic of the internet you can find many images and tutorials to darning, they can explain the process much better than me. These images influenced how I went about my darning.
The link above was for me the most comprehensive and easy to understand guide to darning.
My jersey partially darned.
Darning is like many other crafts in that by practicing doing it will prove better results. My first attempts were acceptable but not amazing.
A darned object has been altered in a way that does not hide the fact too well; darning as well as a number of different design techniques such as the Japanese pottery technique kintsugi can be used to highlight the part that has been repaired. The owner of the item recognizes that the item is more beautiful for having been broken. In the case of my jersey I can recognize that it ripped in several places and reflect upon the memories of adventurous activities I have had whilst wearing the jersey.
In the process of darning along a large tear.
The nicely finished tear darn. It has been turned inside the right way.
I currently have a few other items that need mending, I believe that the more I practice the neater my darning will become. I definitely believe that darned clothing is a fashion statement of sorts; it tells the world that the person wearing the clothes is happy to reuse and fix clothing to give it a longer life. I do not need to throw this jersey out and buy a new one.
The darned jersey arm. Not perfect, but practical.
An opportunity arose. I was asked whilst at the Petone Carnival about the animal shapes we had suspended from our Fire Sculpture. Someone was inquiring how much it would cost to purchase similar shapes from me.
For me this is big. HUGE. As a designer interested in D.I.Y. being given a job where I can spend a few hours playing with tools and making things is a dream come true. After the exchanging of details I planned how it would be done.
The Four animals I would be creating were a Kiwi, a Tuatara, a Morepork, and a Pukeko; this would end up in a kindergarten so they shapes had to be easily recognizable and safe to touch (no sharp edges). The Pukeko is a shape I'd not yet created before, this was going to be a learning curve.
I had to find an image of a pukeko and edit the shape to make the outline as recognizable as possible. I had saved the silhouettes for each of the other shapes from when I created them for the sculpture.
Using the same technique, I projected the image using a computer projector onto ply wood and sketched around the outline of all four animals in pencil. Making the most of the plywood I have; with the leftovers I'll be able to create more shapes (Hopefully for another client).
The oultines of animal shapes on the ply, seen resting on sawhorses ready to be cut out.
Tuatara Outline
Morepork and Kiwi Outline
Then it was out to the garage to cut out each of the shapes using the jigsaw. The process is one of time and precision. I need to move my body around the large piece of ply wood to find the best angle for cutting at.
When cutting with the jigsaw, eye and ear protection is a must.
Finished cutting out the Pukeko
When all four pieces are cut out I am left with a large off cut which I put aside. The four animals are then sanded by a piece of sandpaper held in my hand. This ensures that no heavy tools will damage the shapes. For any areas that need sanding a little firmer, I use the multi-tool which has a triangular shaped sanding head, but is not powerful enough to damage the wood. The edges on each of the shapes were smoothed out making them safe for children to touch.
Pukeko cutout.
Morepork cutout.
Four Animal Shapes: Tuatara, Morepork, Pukeko, Kiwi.
The four native animal shapes were sold. This was a fun project for me, D.I.Y., craft, and working with power tools is something I am passionate about. I enjoy the creation process and I love knowing that my effort is going somewhere where it will be appreciated, loved, used, and built upon; such as a kindergarten. To the best of my knowledge the next step involves the kindy children decorating the animal shapes however they see fit. Brilliant, we are growing our next generation of D.I.Y.ers.
It feels like the Happy Valley Tip Shop is my second home recently. I love the place; there is so much cool stuff that has been salvaged from the landfill that they will give away for a couple of dollars. On my latest trip there I managed to purchase some recycled timber pieces I thought ideal to build a shelf out of.
Earlier this year, a generous Auntie needed to find a new home for her previously treasured Early Childhood Education (E.C.E.) books. They were offered to my partner Shellie as she is currently studying E.C.E. and so two big boxes of books ended up in our house taking up floor space.
The timber from the tip, as well as some leftover pieces of decking timber from around the property were the perfect materials to create some storage furniture for the books.
Decking timber from around the property, it is a bit green.
Timber from the tip shop.
The timber needed some prep work, cutting to the correct lengths and sanding down certain areas. The decking timber had previously been used as a deck and was replaced, the old stuff which I used had a tinge of green to it from twenty years of moisture and mould buildup. This was sanded off with a belt sander pretty easily.
RYOBI electric belt sander.
While I'm showing off tools, below are my RYOBI tools that I have purchased recently. They are a fairly expensive purchase, yet are hard wearing, and a long lasting investment.
Battery and charger.
The bag can holds some tools, I have four batteries, an impact driver, a jigsaw, a multi-tool, and a radio.
Also seen here are a sharp saw, and a measuring tape. Both essential to a handy-man's toolbox.
I began to cut the pieces to their correct lengths with saw. I follow the old adage that my dad has told me time and time again, "Measure twice, cut once".
The small pieces of decking timber will hold the sides together, and will have the shelves nailed to them.
The earmuffs and visor keep me safe from loud noises, from powertools, and even hammers. The visor protects my eyes and face from projectiles e.g. splinters.
Each of the two sides of the bookshelf were created by nailing joining three lengths of decking timber together as one solid piece.
The two bookshelf sides.
Two saw horses helped to stand the two sides up while I nailed the shelves to them.
How to join it all together.
Seen here is the final shelf. This was an easy project that took only a couple of hours. If you have a lot of belongings with nowhere to put them, or are striving for a tidier house, this is an easy piece that can serve your needs.
The finished shelf
Does it look like recycled timber? Yes. Does it serve its purpose? Yes. It does what we need it to, as students we are looking for practicality. We don't need to own expensive brands of furniture to give us a certain financial status, we are content with practicality. The aesthetic of the book shelf is simple, clean, and functional. There is some textural beauty in the corrugations of the decking timber. These were sanded with the belt sander, giving the tops of the corrugations a clean and not green, fresh timber look, but this is contrasted with the dips in the wood which still show the old, dark, weathered timber. These little details appeal to me. I find that recycling of materials into something practical is beautiful.
The book shelf is full.
There is one more thing I would like to do to this book shelf, in accordance with my manifesto, and that is to inscribe into the wood the origin of the materials, as far back as I know; and the processes that these materials undertook in becoming the bookshelf you see now.
The timber shelves would have a history to them, a past life, a purpose for which they were previously used for. As for the decking timber, it knows twenty years of family life; twenty summers of family BBQ's and childhood adventure; twenty winters of rain, wind, and sometimes snow. These stories are something I would like to celebrate in the creation of this book shelf.
Job done. I no longer have education books all over the floor.
This week I am lifting content straight from my university work, Yesterday I handed in and presented my first project in the course 'Experimenting with materials'. The project focussed on taking a material and destroying it in order to make something new. Destructive Creation. We worked with physical techniques such as smashing, heating techniques such as melting, and chemical techniques such as rusting. Read on for more.
Heres what Interested me about this project:
Over the course of my university life I have been able to define myself as a designer by what interests me and what I think is important. The two things that this comes down to are
1: D.I.Y., The culture that surrounds it, the practice of doing it, and all of the benefits that go along with that.
2: Sustainability, creating in a sustainable way that does not impact the earth negatively, whether this be recycling old materials, making the most of green spaces, or any number of other things.
Our second lecture of this course was inspiring to say the least. As soon as I saw the calm waves seen of the video below I knew I was watching something special. It contains all things that I love, DIY, Sustainability, Film, Fire, Re-use, and beautiful scenery to name a few.
I'll try not to get too poetic about my feelings towards this video, but I thought two things after watching this video for the first time. 1. Why aren't more people doing this, and 2. I have to do this.
After a small internet search I found a couple of lo-fi, videos showing that people already are doing this on an amateur level.
See the videos here for a gow to turn old plastic into a new and beautiful slingshot.
Needless to say it was my turn to have a go.
I started with a walk on my local beach in Makara.
My girlfriend Shellie and I walked the beach for 40 minutes filling our buckets to the top. There were bottle caps and plastic rope, and all other plastic crap you can think of.
Back at home this is our haul.
Before I could use it it needed to be sorted and washed.
Here is your daily dose of disturbing images.
As seen here, plastic discarded from people everyday that gets washed down rivers and out into the ocean gets mistaken for food by birds such as the three species of endangered albatross (There are a further 19 species of threatened albatross).
In an ideal world everyone would go out into the ocean, or down to the beach, fish out some old plastic, and use that instead of making more new stuff.
I want to work further in the area of plastic recycling, below are some of my experiments.
My first experiment was indoors on a kitchen element. The plastic melted to the extent that it was maleable but still identifiable, this created a vibrantly coloured bottle top pancake.
From this point on I opted for outdoor cooking. Using an open fireplace would give me a more intense heat, and being outside meant I wouldn't need to worry about getting bad smells throughout the house. My second attempt created a large creen/grey sheet, solid, yet able to be cut into pieces.
My next piece comprised two seperate cooks merged together, the first was perfect, using colourful plastic ropes. The second was awful, it burnt and turned to charcoal, I had used a rubbish grade of plastic. However, I was still able to chop and drill into the block.
Now I would focus my experiments a little more.
My first focussed experiment. Melting milk bottles into a goo I poured it into a cubic mould. Once cooled and removed from the mould it was scalded on the outside, once sanded away it unveiled the light coloured marbling seen here.
The next experiment was melted to extreme heats to the point that the plastic turned to liquid. The molten plsatic was poured into a mould and after bubbling, cracking and eventually setting and cooling I took to it with a band saw, exposing these brilliant marbling patterns.
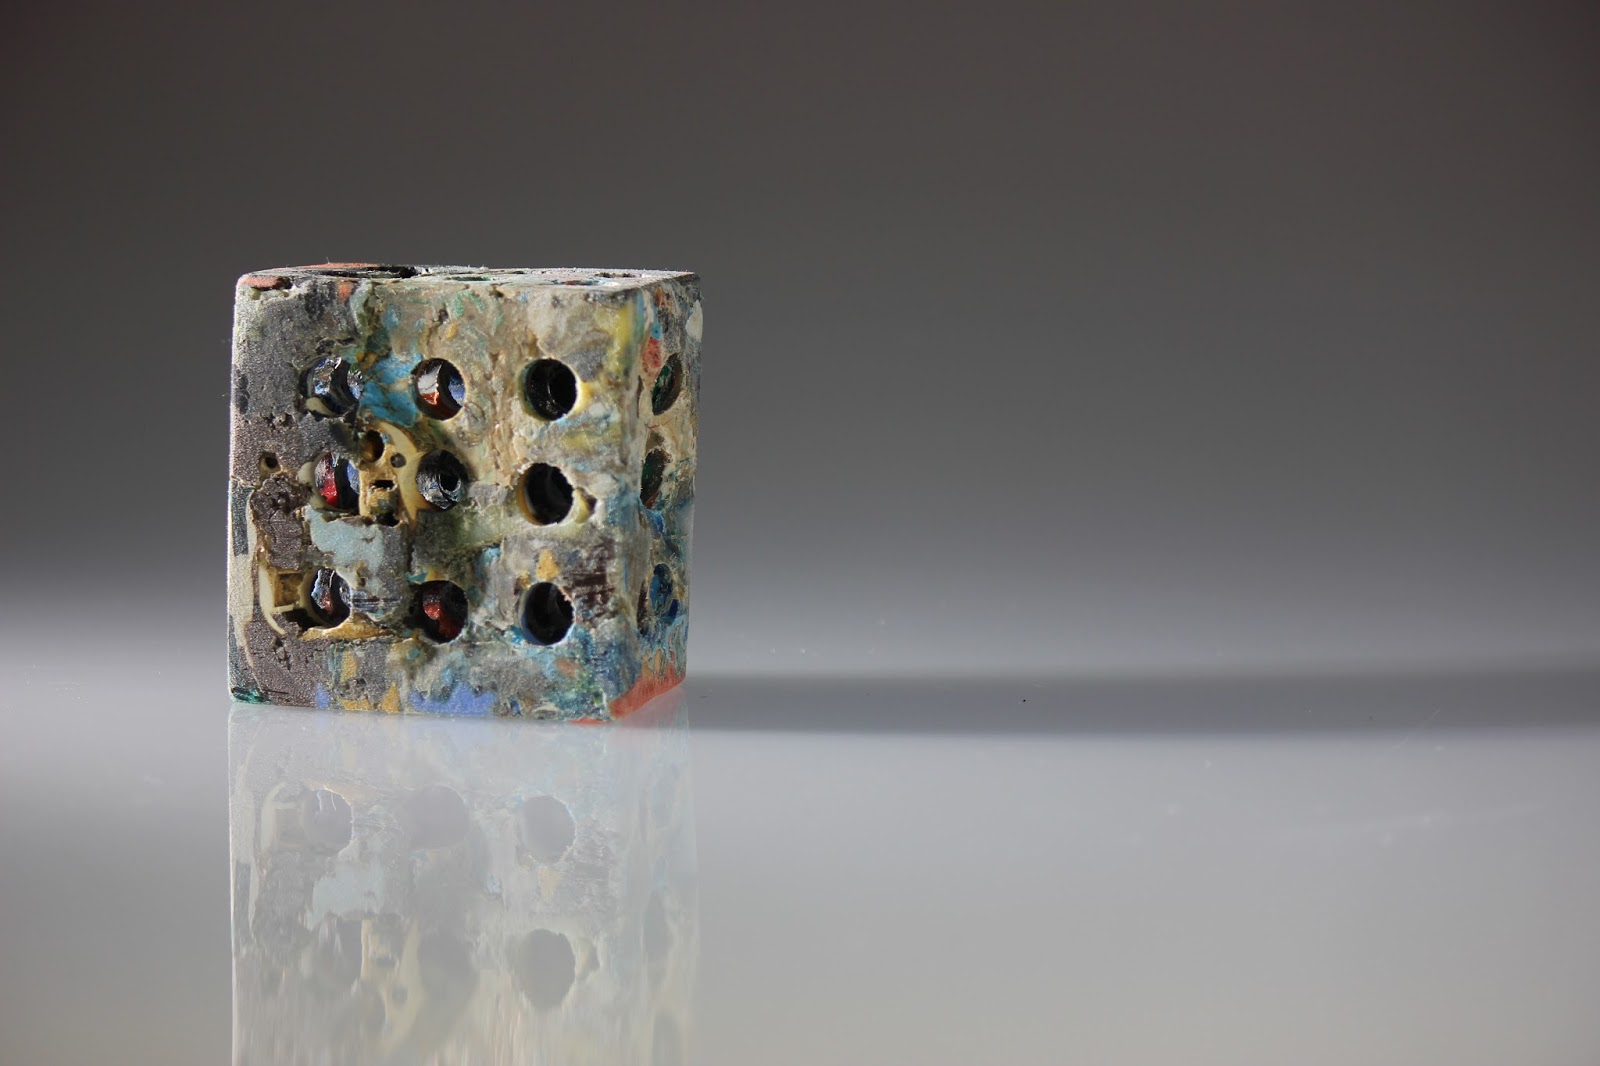
My final experiment had colour. Vibrant colours that I wanted to bring out and expose. By drilling through it I exposed the colours hidden in the center.
Although it does just look like a block with holes in it, that isn't the point. The point is that by creating your own plastic mould you can create anything. Any shape that you can come up with has the potential to be made out of the rubbish found on the beach.