Showing posts with label Waste. Show all posts

Monday, 17 October 2016

Spontaneous Table Construction

The weekend just been has been a weekend of laziness and recovery.
My fiancee Shellie and I headed up the island on a road trip to Napier with our good friend Liv, we shared the weekend with friends and did activities that required little effort and encouraged the recovery of the body and mind. Sleeping in past 8.00AM; eating good food in supurb locations; Relaxing our joints and muscles at Ocean Spa; and sharing a couple of cheeky beers.
A Picnic Lunch at White Pine Bush with friends.
Sunday lunch was roast chicken, and while that was cooking I noticed a pile of timber, old bed slats from a broken bed. I asked our host Terry what we could do with it, make a chair? a table? a stool?
Broken bed and the timber slats that we recycled.
Terry had been meaning to do something with the wood for some time, my prompt was the kick up the bum that he needed to do it. A plumber by trade, he had all of the tools required for most home DIY projects. He decided on making a coffee table to sit on the deck, perfect for coffee and other beverages to rest on while we enjoy the summer sun in Napier. 
The table top with one edge holding it together.
We cut six of the old bed slats down to size to make the table top and then cut four more pieces to hold them together as edging. Terry's tools were Makita brand, they took some getting used to, as they have subtle differences to my Ryobi brand tools. The Skill saw had a different safety catch and it took some time for me to line each cut up as I had to figure out where to line the saw with the cut. This goes to show that every handyman has their preferred tools and each tool has its own subtle differences.
The self drilling screws used pulled the table together snug and strong.
The four edge pieces pulled the table top together, the final step was to create legs at the desired height for the table. Terry decided on using an excessive eight pieces of wood to create an L shape in each corner that would hold the table together rigidly. I thought four pieces would be sufficient but Terry was determined.
Terry with the near finished tabletop.
Whilst attaching the leg pieces Terry drilled the pieces together while I held the table tightly to ensure all pieces fit together correctly
The finished table
This small project took us around 90 minutes to complete, we enjoyed having a project to do, it cleared up the mess of the broken bed and transformed it into something beautiful and practical. We enjoyed the Sunday sunshine and when we were finished the chicken was cooked and it was lunch time.
Liv and Shellie enjoy each others company and the presence of the new table.
Construction projects don't have to take a long time, and I am finding more and more as I continue to practice my skills and improve it takes less time to build things.

Construction is a great hobby to get into; it uses your body in a physical way, allowing you to develop your gross and fine motor skills and your hand/eye co-ordination.

Through physical construction you make things, an end product, ideally something useful that can make someone's life a little bit better.

Construction encourages cultures of sustainability and recycling, making the most of all of your resources to ensure minimal waste is left behind.

Construction also strengthens relationships, Terry and I have bonded as mates through building something together, and now other people can stregthen their relationships with each other by enjoying each others presence whilst using the new drinks table.

Thursday, 6 October 2016

Don't throw out! Use, Store, or Donate.

When it comes to spring cleaning and getting rid of all of the junk that you no longer use take a moment to consider where you might be able to send that stuff before concluding that it is rubbish doomed to a landfill. Also in your everyday dealings with waste consider these alternatives that are more environmentally friendly.
Getting started with the spring cleaning.
Appliances:
Old appliances when no longer useful or obsolete tend to take up space in a house. I still have an old Apple I-mac I am holding on to for no good reason. Some appliances still have value and it is easy to sell them on websites such as http://www.trademe.co.nz/ or in shops such as Cash Converters. If someone else can make use of it and you can profit from it then why not?

If that doesn't work you can try giving it away for free on websites such as https://nz.freecycle.org/. Here people give objects they don't want and take objects that other people no longer need. This website encourages re-purposing of everything from televisions and keyboards to glass jars and microphone stands.
Apple Imac. Taking up space and not being used.
Household items:
Anything intact and not electronic can generally be gifted to a second hand store, clothing, furniture, household goods, toys and books.

You can find your local Salvation Army Family Store here.
You can find your local SPCA Op Shop here.
You can find your local Wellington Vinnies Opshop here.
You can find your local Wellington Mary Potter Hospice Shop here
One of Wellington's many Op-shops.
http://www.vinnies-wellington.org.nz/wp-content/uploads/2015/01/Khandallah-Shop-Outside-2015-small.jpg
Clothing:
As well as the Op-shops listed above, there are some places that will take only clothing. Recycled clothing experts such as Rebound Clothing and SaveMart will take all clean clothing, even if it is ripped and useless.

Read here how SaveMart recycles through every step of their business:

Where does our stock come from?
It comes from various sources including:
1.Clothing Bin Contracts,
2.Recylcing Projects,
3.Woollen Mills,
4.Clothing Manufacturers,
5.Carpet Manufacturers,
6.Imports,
7.Surplus Stock,
8.Seconds and Opportunity Stores.

Hundreds of dedicated employees sort the incoming stock in to those items deemed suitable for sale in our stores, only the very best quality makes it onto the shop floor. It is value priced to sell in the same week. Unsold stock is removed after 4 weeks.

All wearable clothing etc that is unsuitable for sale in SaveMart stores is sent to Papua New Guinea where there is great need for clothing especially in the highland villages.

Inevitably there will be garments and material that are not able to be used again as originally intended, these can still be recycled as follows;

Cottons are made into Cleaning Rags, Knitted woollens and acrylic go to India to be made into blankets for relief organisations, Carpet yarn is used in the insulation industry.

Our aim is to recycle everything possible.
The inside of a SaveMart store, full of recycled clothing for sale.
http://savemart.co.nz/images/SaveMart_New_Brighton_065.jpg
Clothing Bins can be found in most suburbs throughout Wellington.
http://everydaysustainability.info/wp-content/uploads/2015/09/clothing-bin.jpg
As a person who always tries to make the most out of what I have got I tend to accumulate things, I'd like to differentiate between my thriftiness and being a hoarder because I try to use the things I accumulate. I have little containers filled with bits and bobs that I use from time to time. Here are a few examples of the stuff that I have that I hold onto for later use instead of throwing away.

Paper. Empty excercise books, blank paper, coloured paper, I have a pile of all sorts of paper that I can use whenever I need it. I use it to draw pictures, design my next project, scribble on, write lyrics or poems on, anything that I need blank paper for I have it sorted.
Shelf full of assorted leftover paper, to use when I have need. 
Scraps of paper. I tend to accumulate scraps of life in the form of paper, whether this be ticket stubs, pictures, words, cards, post cards, photographs, or any number of other beautiful things; I tend to keep them. I have previously organized these onto cork boards, but more recently I have compiled them into a scrapbook. My scrapbook is a way for me to remember many scraps of time in a creative way, I glue all of the different pieces into the book, and then draw and write words around it; I empty my brain of all of the memories associated with that physical piece of my history.
A few open pages of my scrapbook.
Some of the images and physical memories within my scrapbook.


I have old notebooks intended for drawing in. I challenge myself to fill them up, here I get the most crazy images that come from my mind, they are for my eyes only unless I choose to share them, and I get to use the pen and paper in a way that nobody judges. I challenge you to find an old notebook around and to fill it up with ink in anyway that you can.

A Sneak peek from my weird doodling book.
Other Junk: I keep a lot of other junk hidden away for when I need it. I use old containers to store things in. Have a look at this older blog post about storage conatiners for some examples.

As you can tell I try hard to reuse as much stuff as I can, however I am realistic and know when something is at the end of its life and should be recycled or thrown away. The key part is really trying to make things last.

When something reaches the end of its life be sure to recycle it if possible, some plastics can be added to your weekly recycling collection, as can some metals; other metals will need to be recycled by taking them to a scrap dealer, if the metal is worth anything you will also receive payment for it.

As the sun begins to stay around a bit longer and you approach spring cleaning, be sure to minimize waste, re-use and recycle.

Wednesday, 4 May 2016

Guitar Stand

For years at my home and again at our flat I've had to slump  my guitars in the corner of the room; this gets them out of the way which is good, but there are a couple of downsides to this method is storage, the first being it doesn't look very attractive; The other downside is that when I want to use a guitar I have to lift the other guitars out of the way and try not to clatter them around too much, I fear doing this scratches them and knocks them about which isn't too good for the acoustic guitars which already have a few bumps and scratches.

On my to do list was to create a guitar stand that could house my guitars. I had a source of timber from the pellets I had deconstructed and I began to draw up some plans.

Two small pieces of 4×2 for the base. On top of this will sit two larger pieces of 4×2, these will have the body of the guitar resting in them. Two pieces of 2×2 will stand vertical at the back of the base. One piece of timber will be a back support joining the two 2×2. Lastly six pegs will stick out from the top of the guitar stand to separate the guitars.

Construction started Saturday with Shellie and I building the base. Next we needed to attach he 2×2 but the timber we had was painted an awful blue, ideally the guitar stand will be the colour of natural timber. We decided that I would revisit it the next day.


Sunday a good friend of mine Adam came over, us boys took over my man cave and we set to work. I began to sand the blue paint away but it was taking too long without a belt sander. Adam suggested we try to use his little plane. He brought out the tiniest hand held plane I had ever seen and we took turns stripping the paint off with it. I tidied up the 2×2 by giving it a quick sand. We then proceeded to assemble the guitar stand. When it was time to attach the pegs I struggled to see that they would be sufficient, they appeared as more of an eyesore than anything else.


The scrapings of paint and timber it took off the wood.

The tiniest plane I have ever seen,


Having Adam there brought about many new ideas. The best being to replace the pegs with a piece of timber along he top which could then have five notches cut out of it for the guitar necks to rest in. We ended up attaching a peg at each end and then the timber on top. I then measured and drew on the notches and cut them out with my jigsaw.

I also decided that I would like a place to hang a ukulele. I found some dowel that could hold a uke; I used my drill to create some holes for the dowel, an appropriate space apart for a ukulele to hang, I squirted some glue in the holes and then pushed the dowels inside.


The guitar stand was complete. The next step was to put it in its place in  the corner of the room and to decorate it with my guitars. It looked superb once in place. I am absolutely stoked with the way it turned out and I should have done it years ago. The guitar stand completely fills it's purpose, it looks beautiful with the natural wooden tones complementing  the other wooden furniture in the room, and it prevents a mess of guitars from forming in the corner of the room.


To use recycled pellet wood to create a beautiful piece of furniture is a great feeling. I have created something out of recycled free timber which many people discard as dirty and worthless. This is what I live for, finding and creating beauty from nothing.

Wednesday, 27 April 2016

De-Construction of Pellets

With Valley Rovers as a fundraiser we decided to split wood and sell it on. While the wood dried it sat on a bunch of pellets which I got for free by asking nicely at the Dominion Post. As we have started to sell our wood and the pellets have freed up I have been able to take the pellets and make use of them.

I brought them back to our flat and tried a bunch of ways to deconstruct them. The videos below showed a couple of ingenious ways to take pellets apart without destroying the timber. I tried a couple of these methods but they were a bit  hit and miss.
I eventually told a mate of mine who in turn lent me his Stanley Wonder Bar Crowbar. This paired with a hammer did the trick. (Ear muffs were a must for deconstruction).

Stanley Wonderbar - as seen on Amazon.
I deconstructed pellets so as to make new stuff. I have a variety of projects in the line that require a large amount cheap timber, pellets are ideal for this, in my case they are free (apart from transport costs) it just require some time to deconstruct them and make them pretty.

Heres some videos I watched.

This video is a striaght up deconstruction video done with a hammer.
https://www.youtube.com/watch?v=ZtPmUZ-k3aI

This video shows an inventive method using the weight of bricks to seperate the timber.
https://www.youtube.com/watch?v=O7oWaRPpdKU

This video offers a range of methods that didn't apply to me, and is very safety conscious. But still a good watch.
https://www.youtube.com/watch?v=thAsa9jE2QQ

Heres the tools I used.
Hammer - any old hammer will do
Stanley Wonder Bar Crowbar - as seen above
Brush - mine is a wooden handled brush that came paired with a steel shovel, perfect for cleaning the dust and wood shavings off the timber and the floor.

A pile old pellets - yet to be turned into beautiful fresh timber.
Once the timber was separated out I used my claw hammer to remove any nails left in the timber. Sometimes the old rusty nails would snap off in the timber so for safety and the integrity of the timber I had to punch them deeper into the timber using another nail as a nail punch.

http://www.justagirlblog.com/how-to-install-a-pallet-wall-part-1/
The timber needs to have nails removed carefully to ensure its integrity.
The next step is to sand the timber. This strips the surface layer from the wood, revitalizing it and making it seem new again. I borrowed two electric sanders for this job. The first is the belt sander that rips off the old and used top layer of timber. I try not to rip too much off so the timber to give the timber the desired rustic look so people can see that the wood has already lived and served a purpose.

The timber is clamped down while I strip it using the belt sander.
http://www.skibuilders.com/phpBB2/viewtopic.php?t=810
Some timber given a rough sand.

Now that the timber is fresh, revitalized, ready to use I have to come up with a few projects with which I can use the timber. The first thing I wish to make is a wardrobe, as our current room in the flat doesn't have one. Other projects I wish to do with recycled timber include a guitar rack, and a book shelf.

4X2 planks salvaged from pallets and sanded down
A plank salvaged from a pallet. Nails removed and sanded down.
Now to make something, check out next weeks upcoming post to see what project I do first.

Thursday, 21 April 2016

The Alleyway

One of my flatmates is brilliant at talking, he spins tales like intricate little webs with such a poker face that the truth is indistinguishable from a lie. One of these stories has earned him an association with the name 'The Alleyway'.

Adin-Jenks http://adin-jenks.deviantart.com/art/Alleyway-Stock-164030882
An Alleyway is a place that summons up all sorts of dark images of grime and criminal activity. Dodgy trade deals, violence, and drunken antics.

When we moved into the flat we jokingly said that we would get him a sign on his bedroom door that said 'The Alleyway' we teased him for a while about it before leaving it to rest a while. In the back of my mind I've been meaning to get on with making the sign and surprising him with it. Last week I finally got on with making the sign.

I sketched out a few diferent layouts on paper. I then grabbed a skinny piece of ply and sketched out the shape of the letters on the ply with Pencil. When the blocked shapes were perfect I drew over them in vivid marker to make it easy to see when I got to cutting the shape.

My workspace filled with tools


I readied the jigsaw, for such a small and intricate shape as a word I needed to turn the reciprocation speed down and ensure that I was using it on the correct setting that allows for curved cutting on wood. I then set to cutting out all of the negative spaces around the letters this was difficult at times. I struggled to clamp the ply in ways that would hold it firmly but allow my intricate maneuvers with the jigsaw. At times small pieces of ply would chip of and I would have to slow down, this tests ones nerves, any further damage would result in the shape being unusable.

First paint job
When the shape was finished I sanded it with my new toy, a 1/3 sheet sized electric finishing sander; this smoothed both main surfaces. I sanded the edges with scraps of sandpaper allowing my fingers to get in and sand the small grooves.

After the first paint job.


When the shape was done I imagined how it would look on the door. I decided to mount it on a larger piece of wood and also to paint it. I painted it black completely on both sides and the edges and then mounted it on the block of wood.

Initially I had planned to screw it to or hang it on the door but I decided instead to save the door and just duct tape it to the top of the door frame, this meant that no lasting damage would come to the door. Another project was achieved with a scrap of ply and a few hours of work.


The doorway
When my flatmate arrived home and noticed the sign above his door he was both impressed and pissed off at me. The sign is a reminder of his ability to spin believable tales from lies and also how some tales will stick and refuse to come off.
The Alleyway.

Thursday, 13 August 2015

Recycling Plastic

This week I am lifting content straight from my university work, Yesterday I handed in and presented my first project in the course 'Experimenting with materials'. The project focussed on taking a material and destroying it in order to make something new. Destructive Creation. We worked with physical techniques such as smashing, heating techniques such as melting, and chemical techniques such as rusting. Read on for more.

Heres what Interested me about this project:

Over the course of my university life I have been able to define myself as a designer by what interests me and what I think is important. The two things that this comes down to are
1: D.I.Y., The culture that surrounds it, the practice of doing it, and all of the benefits that go along with that.
2: Sustainability, creating in a sustainable way that does not impact the earth negatively, whether this be recycling old materials, making the most of green spaces, or any number of other things.

Our second lecture of this course was inspiring to say the least. As soon as I saw the calm waves seen  of the video below I knew I was watching something special. It contains all things that I love, DIY, Sustainability, Film, Fire, Re-use, and beautiful scenery to name a few.


I'll try not to get too poetic about my feelings towards this video, but I thought two things after watching this video for the first time. 1. Why aren't more people doing this, and 2. I have to do this.

After a small internet search  I found a couple of lo-fi, videos showing that people already are doing this on an amateur level.
See the videos here for a gow to turn old plastic into a new and beautiful slingshot.

https://www.youtube.com/watch?v=W_XUJwINdLw
Melting plastic into a brick.
https://www.youtube.com/watch?v=JyZMWLkcfes
Turning plastic into a slingshot.

Needless to say it was my turn to have a go.
I started with a walk on my local beach in Makara.
My girlfriend Shellie and I walked the beach for 40 minutes filling our buckets to the top. There were bottle caps and plastic rope, and all other plastic crap you can think of.

Back at home this is our haul.
Before I could use it it needed to be sorted and washed.

Here is your daily dose of disturbing images.
As seen here, plastic discarded from people everyday that gets washed down rivers and out into the ocean gets mistaken for food by birds such as the three species of endangered albatross (There are a further 19 species of threatened albatross).

In an ideal world everyone would go out into the ocean, or down to the beach, fish out some old plastic, and use that instead of making more new stuff.

I want to work further in the area of plastic recycling, below are some of my experiments.


My first experiment was indoors on a kitchen element. The plastic melted to the extent that it was maleable but still identifiable, this created a vibrantly coloured bottle top pancake.

From this point on I opted for outdoor cooking. Using an open fireplace would give me a more intense heat, and being outside meant I wouldn't need to worry about getting bad smells throughout the house. My second attempt created a large creen/grey sheet, solid, yet able to be cut into pieces.

My next piece comprised two seperate cooks merged together, the first was perfect, using colourful plastic ropes. The second was awful, it burnt and turned to charcoal, I had used a rubbish grade of plastic. However, I was still able to chop and drill into the block.

Now I would focus my experiments a little more.


My first focussed experiment. Melting milk bottles into a goo I poured it into a cubic mould. Once cooled and removed from the mould it was scalded on the outside, once sanded away it unveiled the light coloured marbling seen here.
The next experiment was melted to extreme heats to the point that the plastic turned to liquid. The molten plsatic was poured into a mould and after bubbling, cracking and eventually setting and cooling I took to it with a band saw, exposing these brilliant marbling patterns.

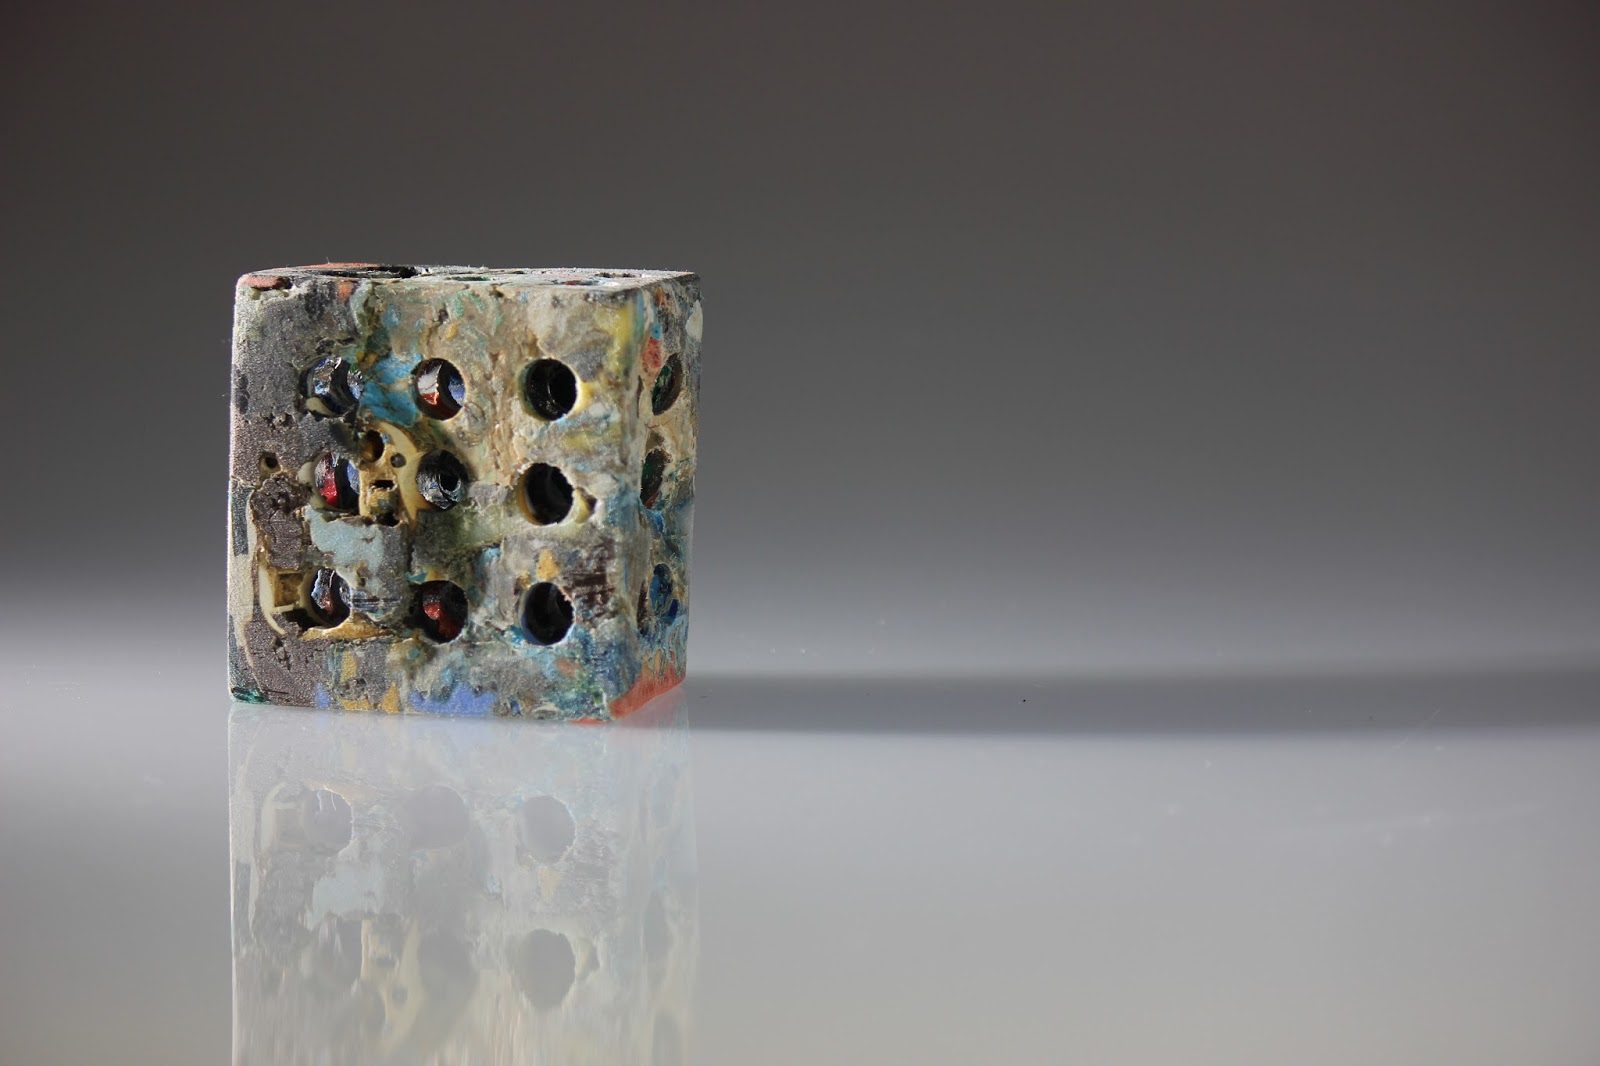
My final experiment had colour. Vibrant colours that I wanted to bring out and expose. By drilling through it I exposed the colours hidden in the center.

Although it does just look like a block with holes in it, that isn't the point. The point is that by creating your own plastic mould you can create anything. Any shape that you can come up with has the potential to be made out of the rubbish found on the beach.

A very exciting prospect.


If you were curious about the end results of my first project in experimenting with materials have a look here:
http://jrhdsdn.blogspot.co.nz/2015/08/final-digital-hand-in-project-1.html

And here is the rest of my Design blog if that interests you:
http://jrhdsdn.blogspot.co.nz/search?updated-min=2015-01-01T00:00:00%2B13:00&updated-max=2016-01-01T00:00:00%2B13:00&max-results=20

Friday, 24 July 2015

Buy from the producer - Market shopping

First of all. I'm sorry its late, this week has been a week of illness and stress and I am only beginning to put the rest of it in order.

Pressing on.

Wellington is a great place to live because on both Saturday and Sunday every week there are veggie markets. I often use the Victoria Street market on a Sunday which is run out of trucks in a car-park block. Another brilliant veggie market is the Hutt City Riverside Car-park market, held every Saturday, this market is similar, but also includes some fast food stalls and other junk stores, and some other types of goods.. Generally they are open all morning until the steady stream of customers dissolve in the early afternoon

http://www.huttvalleynz.com/Events/Riverbank-Market/
The best thing about shopping regularly at the veggie market is that it is cheaper. I won't start crunching numbers here, but your $20 on veggies will make you a lot more stir fry if you spend it at the market than at some super-brand-company that will sell you food that is sub-par for the price you pay. The best thing is saving money, but it isn't the only thing.

By shopping at the market you as a buyer are saying no to the overpriced veg, no to the imported veg, and no to the veg that has been frozen six months ago, only to be defrosted and put on shelves when it is no longer grown, that is given to you from supermarkets. There is no need to purchase fruit and vegetables that are individually wrapped in plastic. When you shop at the market you show your power as a buyer by negating the advertising and signposting of corporate super chains, and choosing for yourself instead, good locally produced food. Simple. You 'Take the power' and 'share the power'. Choosing your own destination for your hard earned coin.
                                      
 
By clicking on the above link and signing your name, you will be helping to rid supermarkets of excess plastic as seen in the image above.
 

Market shopping is good for the soul.
The setup is only present one morning per week and therefore a lot of people rush to one place to buy their vegetables. You will be pushing, squeezing, and excusing your way past many complete strangers, and that is good. You learn skills of interaction not only with them, but also with the tellers.
You are outside, rather than in a warehouse prison that the media has hypnotized you into spending much of your life in. You will experience the weather, you will breathe fresh clean air, and you will have to avoid mess on the ground that no one will cleanup. Market shopping will keep you active, and fill you with your daily dose of fresh air.

http://websta.me/p/671121070847395062_16532272
Market shopping at first can be an overwhelming experience, but when you have learnt to move with the crowds and handle your goods it becomes a fun experience. You will get to know your food better by moving around it and exploring good and less good qualities of food. You will have opportunities to eat and taste your food, One of the best marketplace snacks is vegetarian dumplings. Often times the market will have a busker or two, making music for the people to enjoy, some people love buskers and give them a few spare coins, others despise their attempts to screech out well known lyrics; regardless, buskers add to the environment of humanity found at the market. There are people. Lots of people, you might see a friend you know.
http://blandforddailyphoto.blogspot.co.nz/2014/06/2609-market-busker.html
Holding on to many bags of food as well as operate the mechanism of a wallet and the correct coins can be tricky, but in a fast paced market environment you will learn how to make a transaction fast. Some tips:
1. Take a friend. They can help you hold stuff, while you take on wallet responsibilities.
2. Prepare your money before approaching the teller, and move off to the side once the transaction is complete. This is an efficient way of market shopping that saves you time, and allows those waiting in line behind you to get on with their transaction.
http://peacechild.org/21-easy-ways-to-help-the-environment/
 
 
Market shopping works perfectly with re-useable bags, just weigh and pay for your produce and then put it in your own bag. A decent big bag will save on awkward carrying, and lessen the impact of your consumerism on the environment.
Recently I have even purchased free range eggs from the market, these are at similar prices to your normal Farmer Brown caged eggs from Countdown Eggs. Now that leaves your conscience feeling clean.
Clean your fruit and veg
 Speaking of clean, you must be vigilant at the market to choose produce that isn't spoiled. Check for clean fruit and veg before you buy. A cheaper price at the market means a product with less life, the cheapest bananas will be ripened black in a couple of days so you will have to use them quickly.  Clean your veg when you get home. Some people suggest cleaning produce before you eat it, I suggest cleaning it before you put it away; by doing this you ensure that the produce is not rotten, you can maximize spacial efficiency by cutting up certain produce and throwing out (composting) the waste;
Capsicums are a great example. Cheap to buy in bulk; when I get home with them I chop them up, chop the top, the bottom, cut out the seeds and core, and cut the stem off the top piece, you will be left with the top, the bottom, and a large round. Rinse these in water, shake off any excess water, and then put them in the  fridge in a container, ready to use when you need them.
A whole capsicum chopped, cleaned, and ready to eat.

By buying from the market and looking after your food before you eat it, you will be eating the best healthiest food there is on offer. If you run into me at the market, come and say hi!