I love music, my main collection is in the form of the Compact Disc. CD's are a format that I have grown up with and that suits my needs. I love the feeling of purchasing a new CD and opening it, playing the music, and experiencing the artwork and sometimes lyrics inside that comes with my purchase.
My first ever CD purchase was from the video store in Picton, I was browsing their small collection and saw an album I would likely never see again: 'Primary' by 'Rubicon'. A band from Auckland that found a small amount of popularity in the early 00's due to a song called 'Bruce'. I had to have it, even just to say that I was one of the few people in the country/world to have it.
Some of my collection is from compiling full discographies of an artist as I have done with Shihad, The Datsuns, and Alice In Chains. My CD collection is mostly of Kiwi and Rock music, with a few exceptions, sometimes when browsing a CD store I will see something different that I buy purely out of curiosity, and that purchase sometimes becomes a favourite, like Chirs Jasper's 'Superbad' album.
Iron Cactus shaped CD rack
Flimsy CD rack
My organization of the physical CD's has always been done using CD racks, the CD rack has been my chosen piece of display furniture as it enables many CDs to be stored in one place and is easy to access. Sometimes however, CD's fall from the rack, and make a mess, and it turns out they aren't they most space efficient. The two CD racks above are no longer in use as they are not very practical.
It was time to reorganize.
I decided to build a simple shelving unit specifically for the purpose of storing my CD's. I had some pieces of timber perfect for building such a shelf so I got to it. I measured the two side pieces and the back piece so they were the correct height, I then measured six shelves to be the same length as the width of the back piece. I screwed the sides to the back piece and then measured out the correct spacing between each shelf before screwing them together.
My new shelving unit made of recycled timber.
Now I could display more of my CD's in a smaller area (150 approx). Also this purpose built shelf allowed space for the CD's which were not standard size. e.g. the box for Korn's 'horrific little mutations'* album and the Supergroove box set of EP's.
Five empty shelves
I am very happy with this CD shelf. It suits its purpose extremely well and fits the look of my bedroom which is full of other handmade wooden furniture.
When it comes time for me to leave the flat that I am in, this shelf will be easy to move without having to remove the CD's, another convenience that will save time and energy.
The finished and full CD shelf next to my other CD rack.
I might need to make another of these shelves soon enough.
*The Korn album I am referring too is better known as 'untitled', named this way so that the listener could name it as they see fit.
Korn 'Untitled' or 'Horrific Little Mutations' or anything you want to call it.
For years at my home and again at our flat I've had to slump my guitars in the corner of the room; this gets them out of the way which is good, but there are a couple of downsides to this method is storage, the first being it doesn't look very attractive; The other downside is that when I want to use a guitar I have to lift the other guitars out of the way and try not to clatter them around too much, I fear doing this scratches them and knocks them about which isn't too good for the acoustic guitars which already have a few bumps and scratches.
On my to do list was to create a guitar stand that could house my guitars. I had a source of timber from the pellets I had deconstructed and I began to draw up some plans.
Two small pieces of 4×2 for the base. On top of this will sit two larger pieces of 4×2, these will have the body of the guitar resting in them. Two pieces of 2×2 will stand vertical at the back of the base. One piece of timber will be a back support joining the two 2×2. Lastly six pegs will stick out from the top of the guitar stand to separate the guitars.
Construction started Saturday with Shellie and I building the base. Next we needed to attach he 2×2 but the timber we had was painted an awful blue, ideally the guitar stand will be the colour of natural timber. We decided that I would revisit it the next day.
Sunday a good friend of mine Adam came over, us boys took over my man cave and we set to work. I began to sand the blue paint away but it was taking too long without a belt sander. Adam suggested we try to use his little plane. He brought out the tiniest hand held plane I had ever seen and we took turns stripping the paint off with it. I tidied up the 2×2 by giving it a quick sand. We then proceeded to assemble the guitar stand. When it was time to attach the pegs I struggled to see that they would be sufficient, they appeared as more of an eyesore than anything else.
The scrapings of paint and timber it took off the wood.
The tiniest plane I have ever seen,
Having Adam there brought about many new ideas. The best being to replace the pegs with a piece of timber along he top which could then have five notches cut out of it for the guitar necks to rest in. We ended up attaching a peg at each end and then the timber on top. I then measured and drew on the notches and cut them out with my jigsaw.
I also decided that I would like a place to hang a ukulele. I found some dowel that could hold a uke; I used my drill to create some holes for the dowel, an appropriate space apart for a ukulele to hang, I squirted some glue in the holes and then pushed the dowels inside.
The guitar stand was complete. The next step was to put it in its place in the corner of the room and to decorate it with my guitars. It looked superb once in place. I am absolutely stoked with the way it turned out and I should have done it years ago. The guitar stand completely fills it's purpose, it looks beautiful with the natural wooden tones complementing the other wooden furniture in the room, and it prevents a mess of guitars from forming in the corner of the room.
To use recycled pellet wood to create a beautiful piece of furniture is a great feeling. I have created something out of recycled free timber which many people discard as dirty and worthless. This is what I live for, finding and creating beauty from nothing.
I'd always wanted to learn how to darn so having clothing that was falling apart on me was the perfect excuse to.
Like a lot of fabric crafts I have had this preconceived notion that darning was a female craft. Perhaps once upon a time the ladies would jump at the chance to sew, knit, or darn the clothing of men all around to show off their mad skills; maybe not, it is more likely this was a result of a tradition where men were bread winners and women stayed home and didn't spend money; how the times have changed! Nowadays the suggestion that the ladies should do it for you would likely earn you a slap.
In the process of darning.
As more rows are thread the jersey pulls together more easily.
One of my favourite woolen jerseys, a re-purposed school jersey had been looking a bit worse for wear. The sleeves had laddered considerably, and one of the cuffs was hanging by a couple of threads. The idea was to darn these parts of the sleeve to make the jersey look less scruffy, to save it from deteriorating further, and to keep my arms warm as intended.
To darn you need a length of wool, in this case mine is black to match the black wool of the jersey.
A large darning needle, big enough to thread the wool through, a big needle of around 100mm is a good length to use.
A lot of holes are made over joints such as elbows and ankles. For holes like this it is useful to use a cup or egg shape to shape the hole naturally.
The upside down cup is used to stretch the hole out into a natural position for darning.
Through the magic of the internet you can find many images and tutorials to darning, they can explain the process much better than me. These images influenced how I went about my darning.
The link above was for me the most comprehensive and easy to understand guide to darning.
My jersey partially darned.
Darning is like many other crafts in that by practicing doing it will prove better results. My first attempts were acceptable but not amazing.
A darned object has been altered in a way that does not hide the fact too well; darning as well as a number of different design techniques such as the Japanese pottery technique kintsugi can be used to highlight the part that has been repaired. The owner of the item recognizes that the item is more beautiful for having been broken. In the case of my jersey I can recognize that it ripped in several places and reflect upon the memories of adventurous activities I have had whilst wearing the jersey.
In the process of darning along a large tear.
The nicely finished tear darn. It has been turned inside the right way.
I currently have a few other items that need mending, I believe that the more I practice the neater my darning will become. I definitely believe that darned clothing is a fashion statement of sorts; it tells the world that the person wearing the clothes is happy to reuse and fix clothing to give it a longer life. I do not need to throw this jersey out and buy a new one.
The darned jersey arm. Not perfect, but practical.
An opportunity arose. I was asked whilst at the Petone Carnival about the animal shapes we had suspended from our Fire Sculpture. Someone was inquiring how much it would cost to purchase similar shapes from me.
For me this is big. HUGE. As a designer interested in D.I.Y. being given a job where I can spend a few hours playing with tools and making things is a dream come true. After the exchanging of details I planned how it would be done.
The Four animals I would be creating were a Kiwi, a Tuatara, a Morepork, and a Pukeko; this would end up in a kindergarten so they shapes had to be easily recognizable and safe to touch (no sharp edges). The Pukeko is a shape I'd not yet created before, this was going to be a learning curve.
I had to find an image of a pukeko and edit the shape to make the outline as recognizable as possible. I had saved the silhouettes for each of the other shapes from when I created them for the sculpture.
Using the same technique, I projected the image using a computer projector onto ply wood and sketched around the outline of all four animals in pencil. Making the most of the plywood I have; with the leftovers I'll be able to create more shapes (Hopefully for another client).
The oultines of animal shapes on the ply, seen resting on sawhorses ready to be cut out.
Tuatara Outline
Morepork and Kiwi Outline
Then it was out to the garage to cut out each of the shapes using the jigsaw. The process is one of time and precision. I need to move my body around the large piece of ply wood to find the best angle for cutting at.
When cutting with the jigsaw, eye and ear protection is a must.
Finished cutting out the Pukeko
When all four pieces are cut out I am left with a large off cut which I put aside. The four animals are then sanded by a piece of sandpaper held in my hand. This ensures that no heavy tools will damage the shapes. For any areas that need sanding a little firmer, I use the multi-tool which has a triangular shaped sanding head, but is not powerful enough to damage the wood. The edges on each of the shapes were smoothed out making them safe for children to touch.
Pukeko cutout.
Morepork cutout.
Four Animal Shapes: Tuatara, Morepork, Pukeko, Kiwi.
The four native animal shapes were sold. This was a fun project for me, D.I.Y., craft, and working with power tools is something I am passionate about. I enjoy the creation process and I love knowing that my effort is going somewhere where it will be appreciated, loved, used, and built upon; such as a kindergarten. To the best of my knowledge the next step involves the kindy children decorating the animal shapes however they see fit. Brilliant, we are growing our next generation of D.I.Y.ers.
This week I am lifting content straight from my university work, Yesterday I handed in and presented my first project in the course 'Experimenting with materials'. The project focussed on taking a material and destroying it in order to make something new. Destructive Creation. We worked with physical techniques such as smashing, heating techniques such as melting, and chemical techniques such as rusting. Read on for more.
Heres what Interested me about this project:
Over the course of my university life I have been able to define myself as a designer by what interests me and what I think is important. The two things that this comes down to are
1: D.I.Y., The culture that surrounds it, the practice of doing it, and all of the benefits that go along with that.
2: Sustainability, creating in a sustainable way that does not impact the earth negatively, whether this be recycling old materials, making the most of green spaces, or any number of other things.
Our second lecture of this course was inspiring to say the least. As soon as I saw the calm waves seen of the video below I knew I was watching something special. It contains all things that I love, DIY, Sustainability, Film, Fire, Re-use, and beautiful scenery to name a few.
I'll try not to get too poetic about my feelings towards this video, but I thought two things after watching this video for the first time. 1. Why aren't more people doing this, and 2. I have to do this.
After a small internet search I found a couple of lo-fi, videos showing that people already are doing this on an amateur level.
See the videos here for a gow to turn old plastic into a new and beautiful slingshot.
Needless to say it was my turn to have a go.
I started with a walk on my local beach in Makara.
My girlfriend Shellie and I walked the beach for 40 minutes filling our buckets to the top. There were bottle caps and plastic rope, and all other plastic crap you can think of.
Back at home this is our haul.
Before I could use it it needed to be sorted and washed.
Here is your daily dose of disturbing images.
As seen here, plastic discarded from people everyday that gets washed down rivers and out into the ocean gets mistaken for food by birds such as the three species of endangered albatross (There are a further 19 species of threatened albatross).
In an ideal world everyone would go out into the ocean, or down to the beach, fish out some old plastic, and use that instead of making more new stuff.
I want to work further in the area of plastic recycling, below are some of my experiments.
My first experiment was indoors on a kitchen element. The plastic melted to the extent that it was maleable but still identifiable, this created a vibrantly coloured bottle top pancake.
From this point on I opted for outdoor cooking. Using an open fireplace would give me a more intense heat, and being outside meant I wouldn't need to worry about getting bad smells throughout the house. My second attempt created a large creen/grey sheet, solid, yet able to be cut into pieces.
My next piece comprised two seperate cooks merged together, the first was perfect, using colourful plastic ropes. The second was awful, it burnt and turned to charcoal, I had used a rubbish grade of plastic. However, I was still able to chop and drill into the block.
Now I would focus my experiments a little more.
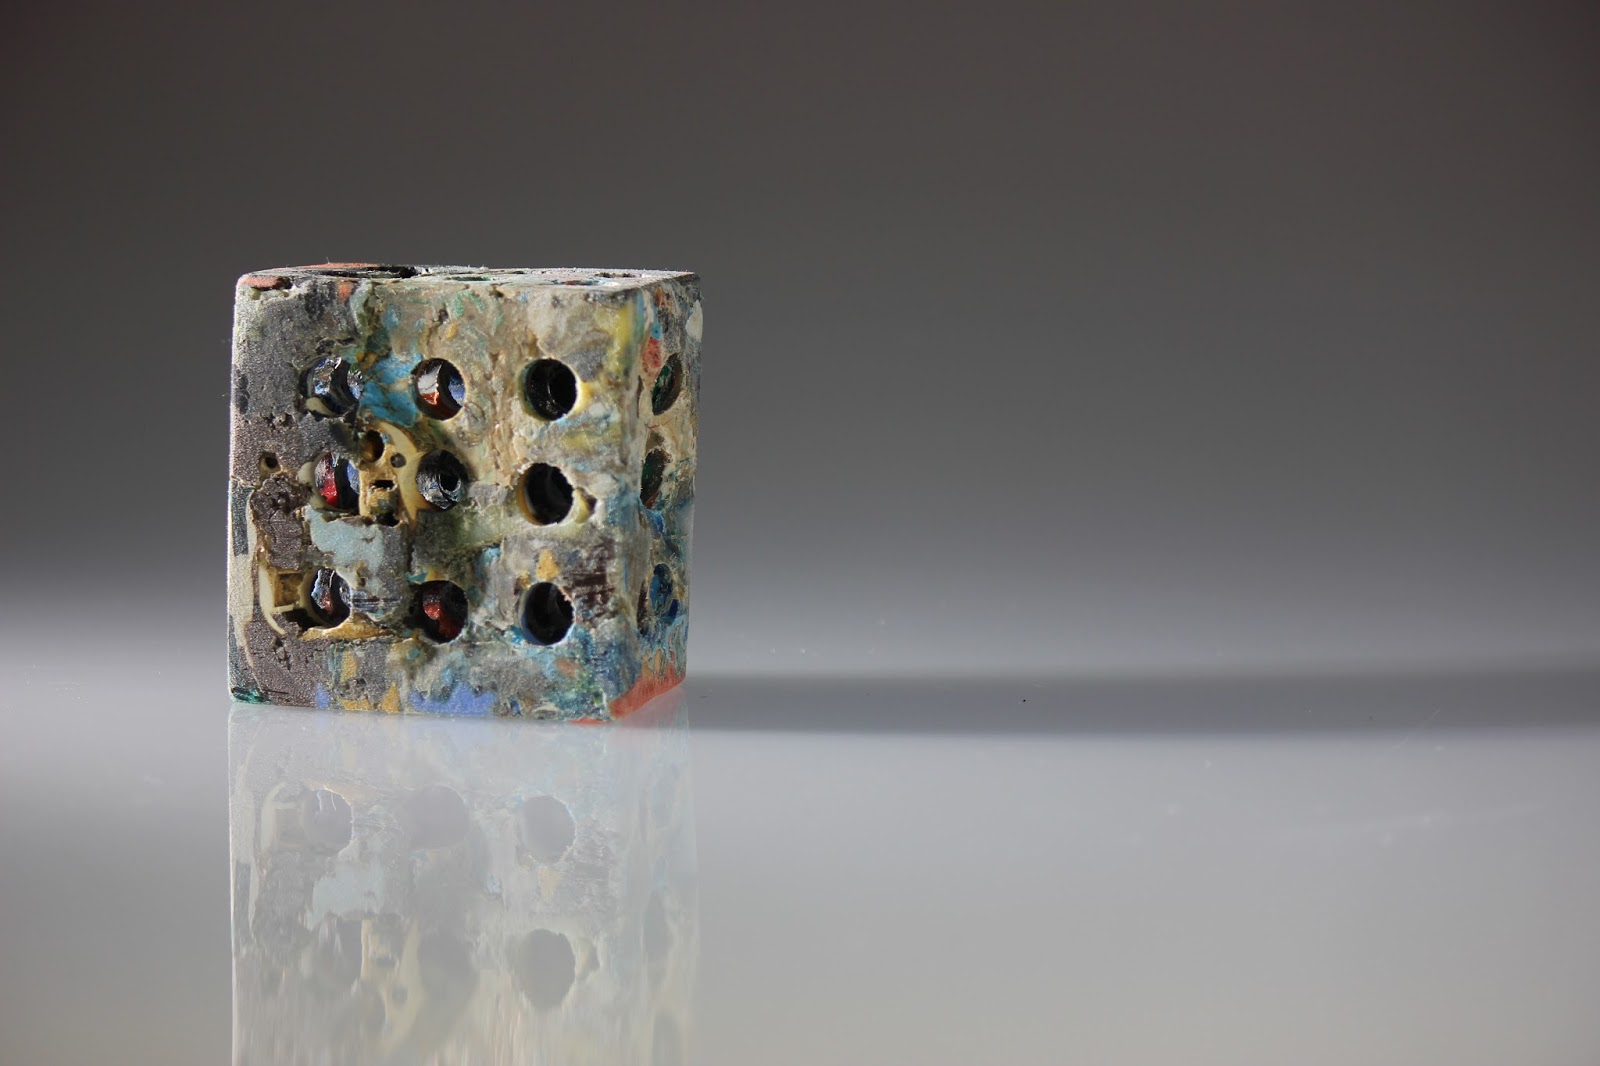
My first focussed experiment. Melting milk bottles into a goo I poured it into a cubic mould. Once cooled and removed from the mould it was scalded on the outside, once sanded away it unveiled the light coloured marbling seen here.
The next experiment was melted to extreme heats to the point that the plastic turned to liquid. The molten plsatic was poured into a mould and after bubbling, cracking and eventually setting and cooling I took to it with a band saw, exposing these brilliant marbling patterns.
My final experiment had colour. Vibrant colours that I wanted to bring out and expose. By drilling through it I exposed the colours hidden in the center.
Although it does just look like a block with holes in it, that isn't the point. The point is that by creating your own plastic mould you can create anything. Any shape that you can come up with has the potential to be made out of the rubbish found on the beach.
I awoke Saturday morning, the 1st of August, my birthday.
I slowly stretched myself awake and climbed out of bed, dressed, fed myself, and then thought. Alright lets get to it.
The car was packed to the roof. We headed out towards the Petone Waterfront and with the help of a few volunteers unloaded the car.
The work didn't start on Saturday; I had been hard at work, preparing various shapes for the sculpture any chance I had throughout the week. Using the silhouettes seen in last weeks post I was able to project onto MDF the image I wanted, draw it on, and then using my jigsaw, cut it out carefully. There were ten shapes of various sizes that I cut out with the jigsaw.
Prep for the first layer.
The organizers from the Hutt Valley Rotary club first put up the bottom section of the tower, the basis of the sculpture. This required digging post holes in the sand of more than a metre deep, and moving the base structure into place. We secured the structure to a bottom pellet, and filled the holes in with sand.
It was time for our construction to begin.
We required five round tiers with a 600mmX620mm square cut out of them so they could fit around the tower and onto a shelf we had made using decking timber.
4 Metres tall
When the first two shelves were up we could erect the top part of the tower, and the scaffolding that would allow us to work on it.
We were told it would be four Metres high, It looked a lot higher when it was standing there waiting to be worked on.
Showing off a jigsaw cut shape: the fleur de lis painted in Scouting colours, as well as a sign with my name on it.
The rain came in and made the day a little miserable, however, work pressed on. We cut out, and set in place the last three round tiers.
We had a friend and scout Hannah helping us to paint the shapes before they were hung up.
Holes were drilled throughout the sculpture that would later be widened with the jigsaw for ventilation, more holes were drilled through each tier to allow the stringing of ropes and the suspension of animals and other shapes.
Setting the Stag in place.
While Chris, Shellie, and Peter strung up the suspended shapes I climbed atop the scaffolding and mounted the Stag, Alan, atop the tower in a position of supreme power over the rest of the Petone Carnival.
Inspecting the teams rope work.
The rain was still coming down and the tide had come in right up to the sculpture, We had finished construction, but we still had to pack up our wet gear, and tidy the site. After the tidy up we admired the sculpture a while before heading to the pub for a quick beer. The planned time of 6.30 was when the sculptures were to be lit.
The finished sculpture in the gloom of dusk as the tide comes in.
A much deserved drink before the big light.
Upon returning to the beach we once more donned our fluorescent vests and walked the beach. Shellie took charge of coating the sculpture in diesel. An important job in the rain to ensure a quick ignition.
Diesel woman Shellie
The first sculpture is lit further down the beach.
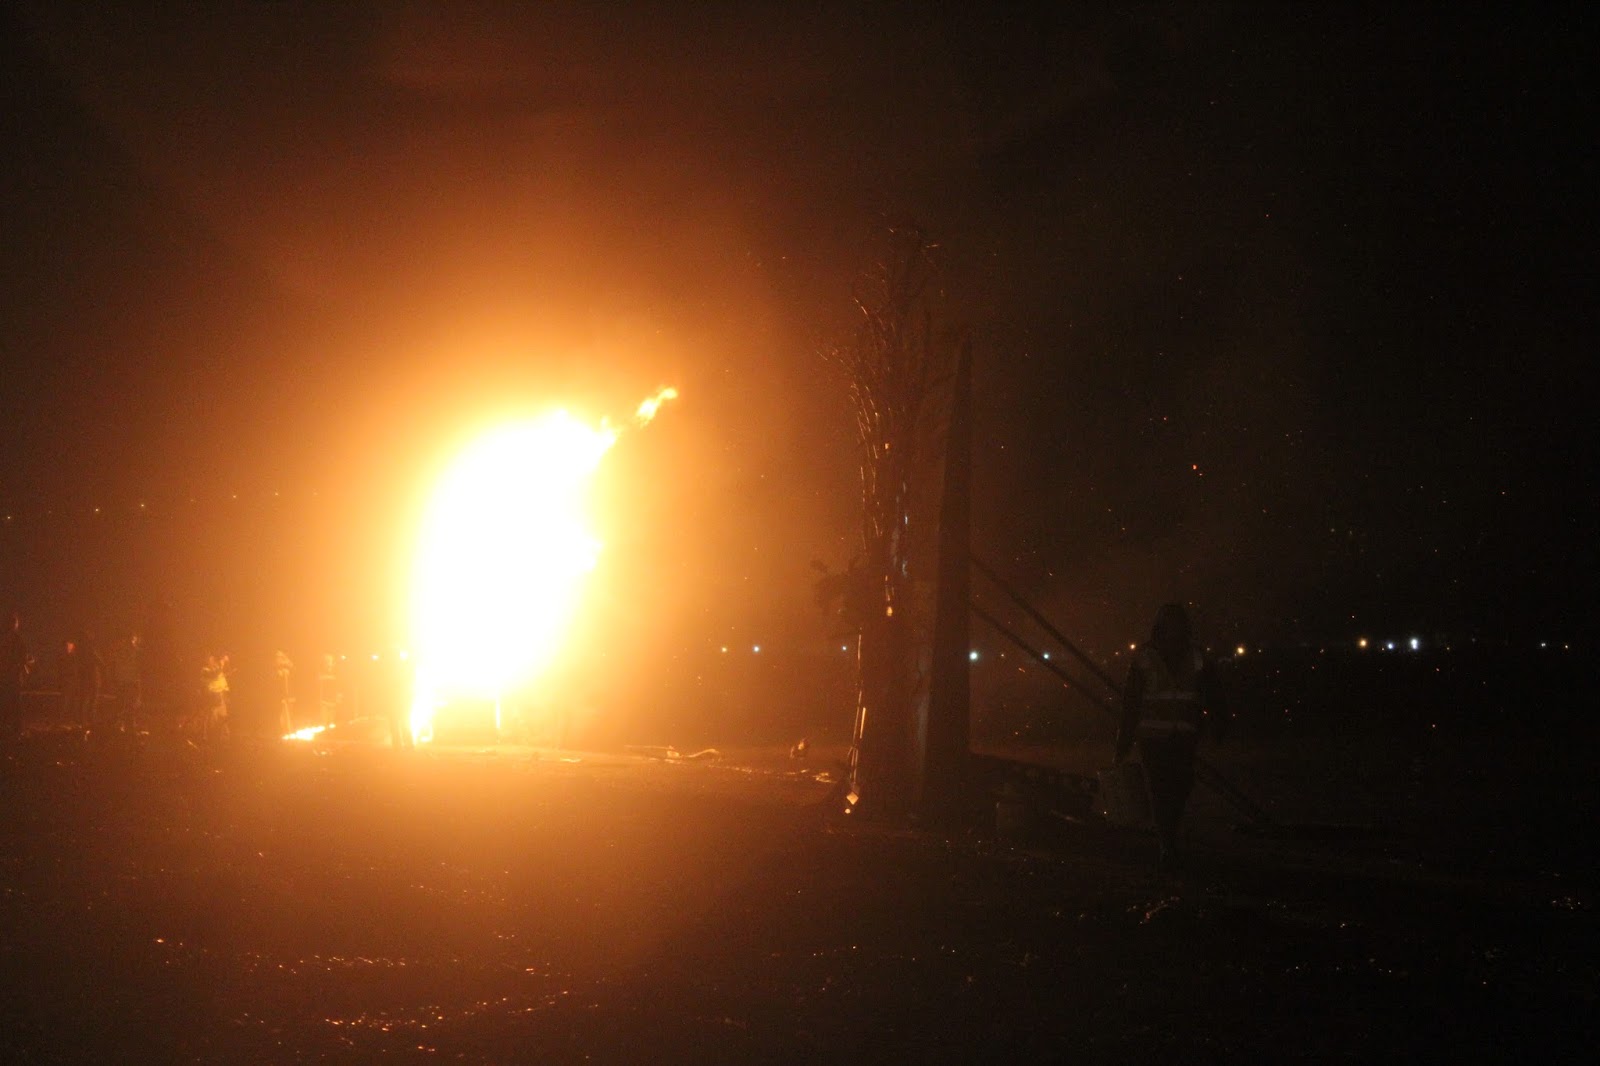
When the first two sculptures were well underway with burning I was given control of the flame thrower and the task of igniting the sculpture was put in my hands.
I felt powerful with the flame gun, and within about a minute the sculpture was roaring to life, the flames battled their way through smoke and cardboard stuffing that filled the centre of the tower.
The animals were aglow with the light coming from the centre of the sculpture. The stag was shrouded in smoke, and as the fire burnt it fought its way up through the cardboard and engulfed the stag in flame, as it escaped the chimney.
Man with a flame thrower.
The smoking stag.
The whole sculpture on fire.
Originally the crowds were supposed to clear the beach and watch from afar, but within minutes of the first fire being lit the beach was full of eager bodies. When our sculpture went up the crowd surrounding it was huge, and it seemed to stay that way for the next half hour. Our hard work through the ick of rain and sand all day had paid off and people were basking in the heat of it, enjoying it.
The crowds observe the burning sculpture.
The flames went up and ate the sculpture from the inside out, we stood around guessing which animal shape would be the first to fall, snapping from its rope; surprisingly they all held very well. As it burnt on we watched in anticipation as the main supports burnt, eager to see the tower fall and crumple into a pile of flaming rubble. When it finally gave way the stag fell and crashed to the ground, on closer inspection he had smashed all of his legs and antlers off and was just a body. The fire crew scraped the large pieces into a large pile and we crowded together as it burnt on.
The flaming Stag.
The other animals warm up.
To me the whole day screamed success. I can't think of a better way to have spent my birthday, working hard on a project of passion, that the public admired, with my friends and family.