Showing posts with label Resurrection. Show all posts

Monday, 17 October 2016

Spontaneous Table Construction

The weekend just been has been a weekend of laziness and recovery.
My fiancee Shellie and I headed up the island on a road trip to Napier with our good friend Liv, we shared the weekend with friends and did activities that required little effort and encouraged the recovery of the body and mind. Sleeping in past 8.00AM; eating good food in supurb locations; Relaxing our joints and muscles at Ocean Spa; and sharing a couple of cheeky beers.
A Picnic Lunch at White Pine Bush with friends.
Sunday lunch was roast chicken, and while that was cooking I noticed a pile of timber, old bed slats from a broken bed. I asked our host Terry what we could do with it, make a chair? a table? a stool?
Broken bed and the timber slats that we recycled.
Terry had been meaning to do something with the wood for some time, my prompt was the kick up the bum that he needed to do it. A plumber by trade, he had all of the tools required for most home DIY projects. He decided on making a coffee table to sit on the deck, perfect for coffee and other beverages to rest on while we enjoy the summer sun in Napier. 
The table top with one edge holding it together.
We cut six of the old bed slats down to size to make the table top and then cut four more pieces to hold them together as edging. Terry's tools were Makita brand, they took some getting used to, as they have subtle differences to my Ryobi brand tools. The Skill saw had a different safety catch and it took some time for me to line each cut up as I had to figure out where to line the saw with the cut. This goes to show that every handyman has their preferred tools and each tool has its own subtle differences.
The self drilling screws used pulled the table together snug and strong.
The four edge pieces pulled the table top together, the final step was to create legs at the desired height for the table. Terry decided on using an excessive eight pieces of wood to create an L shape in each corner that would hold the table together rigidly. I thought four pieces would be sufficient but Terry was determined.
Terry with the near finished tabletop.
Whilst attaching the leg pieces Terry drilled the pieces together while I held the table tightly to ensure all pieces fit together correctly
The finished table
This small project took us around 90 minutes to complete, we enjoyed having a project to do, it cleared up the mess of the broken bed and transformed it into something beautiful and practical. We enjoyed the Sunday sunshine and when we were finished the chicken was cooked and it was lunch time.
Liv and Shellie enjoy each others company and the presence of the new table.
Construction projects don't have to take a long time, and I am finding more and more as I continue to practice my skills and improve it takes less time to build things.

Construction is a great hobby to get into; it uses your body in a physical way, allowing you to develop your gross and fine motor skills and your hand/eye co-ordination.

Through physical construction you make things, an end product, ideally something useful that can make someone's life a little bit better.

Construction encourages cultures of sustainability and recycling, making the most of all of your resources to ensure minimal waste is left behind.

Construction also strengthens relationships, Terry and I have bonded as mates through building something together, and now other people can stregthen their relationships with each other by enjoying each others presence whilst using the new drinks table.

Wednesday, 4 May 2016

Guitar Stand

For years at my home and again at our flat I've had to slump  my guitars in the corner of the room; this gets them out of the way which is good, but there are a couple of downsides to this method is storage, the first being it doesn't look very attractive; The other downside is that when I want to use a guitar I have to lift the other guitars out of the way and try not to clatter them around too much, I fear doing this scratches them and knocks them about which isn't too good for the acoustic guitars which already have a few bumps and scratches.

On my to do list was to create a guitar stand that could house my guitars. I had a source of timber from the pellets I had deconstructed and I began to draw up some plans.

Two small pieces of 4×2 for the base. On top of this will sit two larger pieces of 4×2, these will have the body of the guitar resting in them. Two pieces of 2×2 will stand vertical at the back of the base. One piece of timber will be a back support joining the two 2×2. Lastly six pegs will stick out from the top of the guitar stand to separate the guitars.

Construction started Saturday with Shellie and I building the base. Next we needed to attach he 2×2 but the timber we had was painted an awful blue, ideally the guitar stand will be the colour of natural timber. We decided that I would revisit it the next day.


Sunday a good friend of mine Adam came over, us boys took over my man cave and we set to work. I began to sand the blue paint away but it was taking too long without a belt sander. Adam suggested we try to use his little plane. He brought out the tiniest hand held plane I had ever seen and we took turns stripping the paint off with it. I tidied up the 2×2 by giving it a quick sand. We then proceeded to assemble the guitar stand. When it was time to attach the pegs I struggled to see that they would be sufficient, they appeared as more of an eyesore than anything else.


The scrapings of paint and timber it took off the wood.

The tiniest plane I have ever seen,


Having Adam there brought about many new ideas. The best being to replace the pegs with a piece of timber along he top which could then have five notches cut out of it for the guitar necks to rest in. We ended up attaching a peg at each end and then the timber on top. I then measured and drew on the notches and cut them out with my jigsaw.

I also decided that I would like a place to hang a ukulele. I found some dowel that could hold a uke; I used my drill to create some holes for the dowel, an appropriate space apart for a ukulele to hang, I squirted some glue in the holes and then pushed the dowels inside.


The guitar stand was complete. The next step was to put it in its place in  the corner of the room and to decorate it with my guitars. It looked superb once in place. I am absolutely stoked with the way it turned out and I should have done it years ago. The guitar stand completely fills it's purpose, it looks beautiful with the natural wooden tones complementing  the other wooden furniture in the room, and it prevents a mess of guitars from forming in the corner of the room.


To use recycled pellet wood to create a beautiful piece of furniture is a great feeling. I have created something out of recycled free timber which many people discard as dirty and worthless. This is what I live for, finding and creating beauty from nothing.

Wednesday, 27 April 2016

De-Construction of Pellets

With Valley Rovers as a fundraiser we decided to split wood and sell it on. While the wood dried it sat on a bunch of pellets which I got for free by asking nicely at the Dominion Post. As we have started to sell our wood and the pellets have freed up I have been able to take the pellets and make use of them.

I brought them back to our flat and tried a bunch of ways to deconstruct them. The videos below showed a couple of ingenious ways to take pellets apart without destroying the timber. I tried a couple of these methods but they were a bit  hit and miss.
I eventually told a mate of mine who in turn lent me his Stanley Wonder Bar Crowbar. This paired with a hammer did the trick. (Ear muffs were a must for deconstruction).

Stanley Wonderbar - as seen on Amazon.
I deconstructed pellets so as to make new stuff. I have a variety of projects in the line that require a large amount cheap timber, pellets are ideal for this, in my case they are free (apart from transport costs) it just require some time to deconstruct them and make them pretty.

Heres some videos I watched.

This video is a striaght up deconstruction video done with a hammer.
https://www.youtube.com/watch?v=ZtPmUZ-k3aI

This video shows an inventive method using the weight of bricks to seperate the timber.
https://www.youtube.com/watch?v=O7oWaRPpdKU

This video offers a range of methods that didn't apply to me, and is very safety conscious. But still a good watch.
https://www.youtube.com/watch?v=thAsa9jE2QQ

Heres the tools I used.
Hammer - any old hammer will do
Stanley Wonder Bar Crowbar - as seen above
Brush - mine is a wooden handled brush that came paired with a steel shovel, perfect for cleaning the dust and wood shavings off the timber and the floor.

A pile old pellets - yet to be turned into beautiful fresh timber.
Once the timber was separated out I used my claw hammer to remove any nails left in the timber. Sometimes the old rusty nails would snap off in the timber so for safety and the integrity of the timber I had to punch them deeper into the timber using another nail as a nail punch.

http://www.justagirlblog.com/how-to-install-a-pallet-wall-part-1/
The timber needs to have nails removed carefully to ensure its integrity.
The next step is to sand the timber. This strips the surface layer from the wood, revitalizing it and making it seem new again. I borrowed two electric sanders for this job. The first is the belt sander that rips off the old and used top layer of timber. I try not to rip too much off so the timber to give the timber the desired rustic look so people can see that the wood has already lived and served a purpose.

The timber is clamped down while I strip it using the belt sander.
http://www.skibuilders.com/phpBB2/viewtopic.php?t=810
Some timber given a rough sand.

Now that the timber is fresh, revitalized, ready to use I have to come up with a few projects with which I can use the timber. The first thing I wish to make is a wardrobe, as our current room in the flat doesn't have one. Other projects I wish to do with recycled timber include a guitar rack, and a book shelf.

4X2 planks salvaged from pallets and sanded down
A plank salvaged from a pallet. Nails removed and sanded down.
Now to make something, check out next weeks upcoming post to see what project I do first.

Thursday, 14 April 2016

Christmas Presents - Animal cut outs.

So you've seen my jigsaw, an awesome tool that I love doing projects with. I've got a small collection of recycled and new plywood now that I can easily use to cut out any shape; there are so many shapes that I need to get around to trying out.

For Christmas 2015 I thought I'd stick to the tried and true native birds and animals that I am used to cutting out; these were to be presents for both mine and my partner Shellie's mums. These would go on to decorate our parents garden spaces. Christmas is a time when everyone is stretched for cash, these homemade ply animals show that there is always an alternative to the tacky crap that fills stockings and brings debt.

After drawing, cutting and sanding the animals you get the a finished shaped animal that is safe to touch with no sharp edges.

A couple of kiwis ready for Christmas
A Smooth edged kiwi ready for a new home
Part of the beauty of a project like this is that they can do what they want with them; my mum thought of emphasizing the shape of the kiwi, owl, and tuatara by simply outlining it in black before tacking them to the otherwise boring fence at the back of the property.

Ply Animals on the fence
The ply animals add some shape to the veggie garden


When it came time for Christmas gift giving both of our mothers were pleasantly surprised that we had provided them with something decorative that hadn't cost much money but had required a few hours of work put into them to create.

I'm always looking for a reason to use my Jigsaw so if you have any requests for me to cut out any sort of shape don't hesitate to ask.

Wednesday, 13 January 2016

Fixing a bag into my sewing kit.

This was a cool little project, not a difficult one but one that took some time to do.

It started at a party that was held at our place around four years ago; an unknown girl came along and dropped her bag in the bathroom, leaving it there without any indication of who she was we decided to hold onto it just in case she came back for it.

Inside the bag was a couple of coins and a key. Not much to go on, We never heard from this mysterious person again.

On occasion I have taken the bag out and  thought about how it could be of use. My girlfriend tried to use it as a going out bag once or twice, but we realized that the stitching that held it together was breaking.


Recently I've looked a the bag again and seen that it is actually a fairly old leather bag. the stitching looks like the original stitching and is only just getting old enough to break with the pressure of holding it together.


On the inside is a pocket made not of the original leather, and not sewn on, rather, just super glued on.

Upon looking exploring the properties of the bag I came up with a use; I would turn it into my sewing bag. Starting by removing the strap, I will be sewing this to my camp blanket when I get the chance.

For those of you who do not know I have a camp blanket  that I love dearly. I have hand sewn everything on there including all of the scarves. Some of the badges I share with my partner in crime Shellie, but a lot of them tell of my scouting journey.

For the bag itself I needed to replace the stitching and that's it. Not a hard task, but a task that needed to be done correctly. I took a trip down to spotlight and bought some brown waxed thread, the last of the roll. I hoped it was enough.


I cut out the old thread with some small scissors and a quick unpick, and explored the three leather pieces that I was left with, very simple shapes, a very simple way to make a bag. Next I sewed them back together with the new waxed thread. Not difficult, but it took a good half hour to do.


There it is.

I sorted all of my sewing supplies out, cotton, needles, badges. And fit them all into my new sewing bag.

I think the difference between myself as a sustainability conscious designer and other people as hoarders, is that I intend to use the things that I collect.

A bag that has sat around for years now being used in a way that is beneficial to me. This has many more years of use left in it.

Wednesday, 6 January 2016

Darning my Clothes

I wanted to know could I salvage my jersey?


The deteriorated arm cuff.
I'd always wanted to learn how to darn so having clothing that was falling apart on me was the perfect excuse to.

Like a lot of fabric crafts I have had this preconceived notion that darning was a female craft. Perhaps once upon a time the ladies would jump at the chance to sew, knit, or darn the clothing of men all around to show off their mad skills; maybe not, it is more likely this was a result of a tradition where men were bread winners and women stayed home and didn't spend money; how the times have changed! Nowadays the suggestion that the ladies should do it for you would likely earn you a slap.

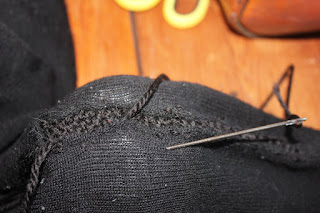
In the process of darning.
As more rows are thread the jersey pulls together more easily.


One of my favourite woolen jerseys, a re-purposed school jersey had been looking a bit worse for wear. The sleeves had laddered considerably, and one of the cuffs was hanging by a couple of threads. The idea was to darn these parts of the sleeve to make the jersey look less scruffy, to save it from deteriorating further, and to keep my arms warm as intended.


To darn you need a length of wool, in this case mine is black to match the black wool of the jersey.
A large darning needle, big enough to thread the wool through, a big needle of around 100mm is a good length to use.
A lot of holes are made over joints such as elbows and ankles. For holes like this it is useful to use a cup or egg shape to shape the hole naturally.
The upside down cup is used to stretch the hole out into a natural position for darning.

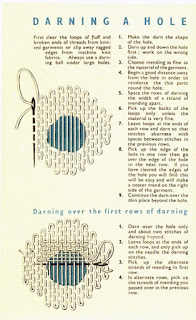
Through the magic of the internet you can find many images and tutorials to darning, they can explain the process much better than me. These images influenced how I went about my darning.

https://en.wiktionary.org/wiki/darn

http://www.ecouterre.com/mend-and-darn-clothing-world-war-ii-style/patch-darn-shirt-mrs-sew-and-sew-4/

https://blog.colettehq.com/tutorials/make-do-and-mend-darning


The link above was for me the most comprehensive and easy to understand guide to darning.
My jersey partially darned.

Darning is like many other crafts in that by practicing doing it will prove better results. My first attempts were acceptable but not amazing.

A darned object has been altered in a way that does not hide the fact too well; darning as well as a number of different design techniques such as the Japanese pottery technique kintsugi can be used to highlight the part that has been repaired. The owner of the item recognizes that the item is more beautiful for having been broken. In the case of my jersey I can recognize that it ripped in several places and reflect upon the memories of adventurous activities I have had whilst wearing the jersey.
In the process of darning along a large tear.
The nicely finished tear darn. It has been turned inside the right way.
I currently have a few other items that need mending, I believe that the more I practice the neater my darning will become. I definitely believe that darned clothing is a fashion statement of sorts; it tells the world that the person wearing the clothes is happy to reuse and fix clothing to give it a longer life. I do not need to throw this  jersey out and buy a new one.
The darned jersey arm. Not perfect, but practical.
Me looking pretty stoked with my fixed jersey.

Wednesday, 2 September 2015

Making a Bookshelf out of scrap.

It feels like the Happy Valley Tip Shop is my second home recently. I love the place; there is so much cool stuff that has been salvaged from the landfill that they will give away for a couple of dollars. On my latest trip there I managed to purchase some recycled timber pieces I thought ideal to build a shelf out of.

Earlier this year, a generous Auntie needed to find a new home for her previously treasured Early Childhood Education (E.C.E.) books. They were offered to my partner Shellie as she is currently studying E.C.E. and so two big boxes of books ended up in our house taking up floor space.

The timber from the tip, as well as some leftover pieces of decking timber from around the property were the perfect materials to create some storage furniture for the books.
Decking timber from around the property, it is a bit green.
Timber from the tip shop.
The timber needed some prep work, cutting to the correct lengths and sanding down certain areas. The decking timber had previously been used as a deck and was replaced, the old stuff which I used had a tinge of green to it from twenty years of moisture and mould buildup. This was sanded off with a belt sander pretty easily.
RYOBI electric belt sander.
While I'm showing off tools, below are my RYOBI tools that I have purchased recently. They are a fairly expensive purchase, yet are hard wearing, and a long lasting investment.
Battery and charger.
The bag can holds some tools, I have four batteries, an impact driver, a jigsaw, a multi-tool, and a radio.
Also seen here are a sharp saw, and a measuring tape. Both essential to a handy-man's toolbox.
I began to cut the pieces to their correct lengths with saw. I follow the old adage that my dad has told me time and time again, "Measure twice, cut once".
The small pieces of decking timber will hold the sides together, and will have the shelves nailed to them.
The earmuffs and visor keep me safe from loud noises, from powertools, and even hammers. The visor protects my eyes and face from projectiles e.g. splinters.
Each of the two sides of the bookshelf were created by nailing joining three lengths of decking timber together as one solid piece.
The two bookshelf sides.
Two saw horses helped to stand the two sides up while I nailed the shelves to them.
How to join it all together.
Seen here is the final shelf. This was an easy project that took only a couple of hours. If you have a lot of belongings with nowhere to put them, or are striving for a tidier house, this is an easy piece that can serve your needs.
The finished shelf
Does it look like recycled timber? Yes. Does it serve its purpose? Yes. It does what we need it to, as students we are looking for practicality. We don't need to own expensive brands of furniture to give us a certain financial status, we are content with practicality. The aesthetic of the book shelf is simple, clean, and functional. There is some textural beauty in the corrugations of the decking timber. These were sanded with the belt sander, giving the tops of the corrugations a clean and not green, fresh timber look, but this is contrasted with the dips in the wood which still show the old, dark, weathered timber. These little details appeal to me. I find that recycling of materials into something practical is beautiful.
The book shelf is full.
There is one more thing I would like to do to this book shelf, in accordance with my manifesto, and that is to inscribe into the wood the origin of the materials, as far back as I know; and the processes that these materials undertook in becoming the bookshelf you see now.

The timber shelves would have a history to them, a past life, a purpose for which they were previously used for. As for the decking timber, it knows twenty years of family life; twenty summers of family BBQ's and childhood adventure; twenty winters of rain, wind, and sometimes snow. These stories are something I would like to celebrate in the creation of this book shelf. 

Job done. I no longer have education books all over the floor.