Wednesday, 4 May 2016

Guitar Stand

For years at my home and again at our flat I've had to slump  my guitars in the corner of the room; this gets them out of the way which is good, but there are a couple of downsides to this method is storage, the first being it doesn't look very attractive; The other downside is that when I want to use a guitar I have to lift the other guitars out of the way and try not to clatter them around too much, I fear doing this scratches them and knocks them about which isn't too good for the acoustic guitars which already have a few bumps and scratches.

On my to do list was to create a guitar stand that could house my guitars. I had a source of timber from the pellets I had deconstructed and I began to draw up some plans.

Two small pieces of 4×2 for the base. On top of this will sit two larger pieces of 4×2, these will have the body of the guitar resting in them. Two pieces of 2×2 will stand vertical at the back of the base. One piece of timber will be a back support joining the two 2×2. Lastly six pegs will stick out from the top of the guitar stand to separate the guitars.

Construction started Saturday with Shellie and I building the base. Next we needed to attach he 2×2 but the timber we had was painted an awful blue, ideally the guitar stand will be the colour of natural timber. We decided that I would revisit it the next day.


Sunday a good friend of mine Adam came over, us boys took over my man cave and we set to work. I began to sand the blue paint away but it was taking too long without a belt sander. Adam suggested we try to use his little plane. He brought out the tiniest hand held plane I had ever seen and we took turns stripping the paint off with it. I tidied up the 2×2 by giving it a quick sand. We then proceeded to assemble the guitar stand. When it was time to attach the pegs I struggled to see that they would be sufficient, they appeared as more of an eyesore than anything else.


The scrapings of paint and timber it took off the wood.

The tiniest plane I have ever seen,


Having Adam there brought about many new ideas. The best being to replace the pegs with a piece of timber along he top which could then have five notches cut out of it for the guitar necks to rest in. We ended up attaching a peg at each end and then the timber on top. I then measured and drew on the notches and cut them out with my jigsaw.

I also decided that I would like a place to hang a ukulele. I found some dowel that could hold a uke; I used my drill to create some holes for the dowel, an appropriate space apart for a ukulele to hang, I squirted some glue in the holes and then pushed the dowels inside.


The guitar stand was complete. The next step was to put it in its place in  the corner of the room and to decorate it with my guitars. It looked superb once in place. I am absolutely stoked with the way it turned out and I should have done it years ago. The guitar stand completely fills it's purpose, it looks beautiful with the natural wooden tones complementing  the other wooden furniture in the room, and it prevents a mess of guitars from forming in the corner of the room.


To use recycled pellet wood to create a beautiful piece of furniture is a great feeling. I have created something out of recycled free timber which many people discard as dirty and worthless. This is what I live for, finding and creating beauty from nothing.

Wednesday, 27 April 2016

De-Construction of Pellets

With Valley Rovers as a fundraiser we decided to split wood and sell it on. While the wood dried it sat on a bunch of pellets which I got for free by asking nicely at the Dominion Post. As we have started to sell our wood and the pellets have freed up I have been able to take the pellets and make use of them.

I brought them back to our flat and tried a bunch of ways to deconstruct them. The videos below showed a couple of ingenious ways to take pellets apart without destroying the timber. I tried a couple of these methods but they were a bit  hit and miss.
I eventually told a mate of mine who in turn lent me his Stanley Wonder Bar Crowbar. This paired with a hammer did the trick. (Ear muffs were a must for deconstruction).

Stanley Wonderbar - as seen on Amazon.
I deconstructed pellets so as to make new stuff. I have a variety of projects in the line that require a large amount cheap timber, pellets are ideal for this, in my case they are free (apart from transport costs) it just require some time to deconstruct them and make them pretty.

Heres some videos I watched.

This video is a striaght up deconstruction video done with a hammer.
https://www.youtube.com/watch?v=ZtPmUZ-k3aI

This video shows an inventive method using the weight of bricks to seperate the timber.
https://www.youtube.com/watch?v=O7oWaRPpdKU

This video offers a range of methods that didn't apply to me, and is very safety conscious. But still a good watch.
https://www.youtube.com/watch?v=thAsa9jE2QQ

Heres the tools I used.
Hammer - any old hammer will do
Stanley Wonder Bar Crowbar - as seen above
Brush - mine is a wooden handled brush that came paired with a steel shovel, perfect for cleaning the dust and wood shavings off the timber and the floor.

A pile old pellets - yet to be turned into beautiful fresh timber.
Once the timber was separated out I used my claw hammer to remove any nails left in the timber. Sometimes the old rusty nails would snap off in the timber so for safety and the integrity of the timber I had to punch them deeper into the timber using another nail as a nail punch.

http://www.justagirlblog.com/how-to-install-a-pallet-wall-part-1/
The timber needs to have nails removed carefully to ensure its integrity.
The next step is to sand the timber. This strips the surface layer from the wood, revitalizing it and making it seem new again. I borrowed two electric sanders for this job. The first is the belt sander that rips off the old and used top layer of timber. I try not to rip too much off so the timber to give the timber the desired rustic look so people can see that the wood has already lived and served a purpose.

The timber is clamped down while I strip it using the belt sander.
http://www.skibuilders.com/phpBB2/viewtopic.php?t=810
Some timber given a rough sand.

Now that the timber is fresh, revitalized, ready to use I have to come up with a few projects with which I can use the timber. The first thing I wish to make is a wardrobe, as our current room in the flat doesn't have one. Other projects I wish to do with recycled timber include a guitar rack, and a book shelf.

4X2 planks salvaged from pallets and sanded down
A plank salvaged from a pallet. Nails removed and sanded down.
Now to make something, check out next weeks upcoming post to see what project I do first.

Thursday, 21 April 2016

The Alleyway

One of my flatmates is brilliant at talking, he spins tales like intricate little webs with such a poker face that the truth is indistinguishable from a lie. One of these stories has earned him an association with the name 'The Alleyway'.

Adin-Jenks http://adin-jenks.deviantart.com/art/Alleyway-Stock-164030882
An Alleyway is a place that summons up all sorts of dark images of grime and criminal activity. Dodgy trade deals, violence, and drunken antics.

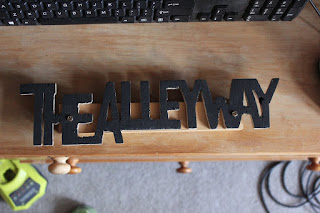
When we moved into the flat we jokingly said that we would get him a sign on his bedroom door that said 'The Alleyway' we teased him for a while about it before leaving it to rest a while. In the back of my mind I've been meaning to get on with making the sign and surprising him with it. Last week I finally got on with making the sign.

I sketched out a few diferent layouts on paper. I then grabbed a skinny piece of ply and sketched out the shape of the letters on the ply with Pencil. When the blocked shapes were perfect I drew over them in vivid marker to make it easy to see when I got to cutting the shape.

My workspace filled with tools


I readied the jigsaw, for such a small and intricate shape as a word I needed to turn the reciprocation speed down and ensure that I was using it on the correct setting that allows for curved cutting on wood. I then set to cutting out all of the negative spaces around the letters this was difficult at times. I struggled to clamp the ply in ways that would hold it firmly but allow my intricate maneuvers with the jigsaw. At times small pieces of ply would chip of and I would have to slow down, this tests ones nerves, any further damage would result in the shape being unusable.

First paint job
When the shape was finished I sanded it with my new toy, a 1/3 sheet sized electric finishing sander; this smoothed both main surfaces. I sanded the edges with scraps of sandpaper allowing my fingers to get in and sand the small grooves.

After the first paint job.


When the shape was done I imagined how it would look on the door. I decided to mount it on a larger piece of wood and also to paint it. I painted it black completely on both sides and the edges and then mounted it on the block of wood.

Initially I had planned to screw it to or hang it on the door but I decided instead to save the door and just duct tape it to the top of the door frame, this meant that no lasting damage would come to the door. Another project was achieved with a scrap of ply and a few hours of work.


The doorway
When my flatmate arrived home and noticed the sign above his door he was both impressed and pissed off at me. The sign is a reminder of his ability to spin believable tales from lies and also how some tales will stick and refuse to come off.
The Alleyway.

Thursday, 14 April 2016

Christmas Presents - Animal cut outs.

So you've seen my jigsaw, an awesome tool that I love doing projects with. I've got a small collection of recycled and new plywood now that I can easily use to cut out any shape; there are so many shapes that I need to get around to trying out.

For Christmas 2015 I thought I'd stick to the tried and true native birds and animals that I am used to cutting out; these were to be presents for both mine and my partner Shellie's mums. These would go on to decorate our parents garden spaces. Christmas is a time when everyone is stretched for cash, these homemade ply animals show that there is always an alternative to the tacky crap that fills stockings and brings debt.

After drawing, cutting and sanding the animals you get the a finished shaped animal that is safe to touch with no sharp edges.

A couple of kiwis ready for Christmas
A Smooth edged kiwi ready for a new home
Part of the beauty of a project like this is that they can do what they want with them; my mum thought of emphasizing the shape of the kiwi, owl, and tuatara by simply outlining it in black before tacking them to the otherwise boring fence at the back of the property.

Ply Animals on the fence
The ply animals add some shape to the veggie garden


When it came time for Christmas gift giving both of our mothers were pleasantly surprised that we had provided them with something decorative that hadn't cost much money but had required a few hours of work put into them to create.

I'm always looking for a reason to use my Jigsaw so if you have any requests for me to cut out any sort of shape don't hesitate to ask.

Wednesday, 6 April 2016

Our New Flat and the Dungeon.

Shellie and I and three other friends got together and decided we need to get a place to ourselves. We began the flat hunt. After a few good flat viewings, being disappointed when we missed out; and a few terrible flat viewings and counting our lucky stars that we can afford not to have to put up with that level of filth; we found a place in Wadestown on Weld St.
We spent an exhausting Saturday moving in and then over some celebratory beers we fittingly came up with a name for our house “The Forge”.

The forge is the perfect residence for us at this stage of our lives. Each of us has a large enough bedroom. There is enough parking space for our cars and the scooter. There is a space out the front of the house ideal for BBQ’s and sun bathing. The location in Wadestown is close enough to everything, plenty of fast food eateries, a dairy, a bus stop, a taxi stand, and only a five minute drive to the city. There are plenty of green spaces nearby including the Ahumairangi hill, perfect for weekend runs, and Trellisick Park, which has plenty of walking tracks and picnic spots.

The property also includes a space beneath the lounge which had been neglected and deemed a spot for rubbish storage. When I first saw this area of the house I was excited, I could make excellent use of such a space.
Halfway through sorting the junk and adding my own belongings
I spent the night of Wednesday cleaning out the space which has the flat has dubbed “the dungeon”. There were all sorts of lost treasures and junk buried in there. Old benchtops, doors, a bed base, pieces of a couch, a mirror, timber, shelves, a sink, a playstation, a creepy music box, gardening tools, a watering can, storage bins, the list goes on.
A creepy music box
A big mirror


The first thing I did was using a scrap of GIB clear away the masses of spider webs throughout the space. I stacked all of the wood in a corner, out of the way. I didn’t bother to remove the rubbish and other junk, but I did stack it neatly out of my way.

Accumulated cobwebs
Next I gave the place a good sweep. There was years of dust piled up across the floor, hidden within every nook and cranny, and throughout all of the shelves. I just swept it under the floorboards, as underneath is the ground; dust is dirt so to the dirt with the dust.
As the tidy up continued

All along the front wall of the dungeon is a huge display of shelves, these provide the perfect space to put all of my D.I.Y. bits and bobs, and things I usually put in the garage.
Storage and Workbench

The dungeon provides a space for my belongings which I don't mind getting dusty, this includes things like Outdoors equipment, ropes, tents etc.
The mountain of rubbish which previous tenants left behind.
As it is a long room it is ideal for small target practice. I have a toy BB gun and the space is ideal for shooting cans with the gun.

One of the flat mates  has a dart board which he has allowed to be setup in the dungeon. I measured up the hooks and then put a couple of nails into the wall studs. I hung it on the wall and it provides an excellent environment to practice accuracy with darts.
A beautiful piece of artwork.
A couple of things that I haven't gotten around to are fixing the air ventilation system which has been poorly attached and even more poorly duct taped. So with a friends help I'll do a better job of taping it.
Fantastic Ventilation; Yeah Right!
There are also a few wires that hang down from above my head that lead to the lights and other electrical outlets, I want these well away from my head space so that I don't pull them down, removing the light source in there or electrocuting me.
It's my space and I'll put what I want in it
Ultimately the dungeon is a space for me to play with my tools. I am always looking for projects to do with which I can use my tools, I stapled some pieces of cardboard to the wall so I could write up my upcoming projects and have them in front of me as a reminder. I have a few projects planned, so watch this space updates.

Tuesday, 9 February 2016

D.I.Y. Painting a Mural.

Shellie And I on holiday in the far north of NZ
In my first year at University I left home and moved in with my partner Shellie. We were soon told that a small two bedroom house could be our house while we study if we did the renovations; and so we did.
Myself painting the fine details.
Diamond the cat chilling against a pre painted house


When the uni holidays came about we set to work emptying the house of all furniture, old paintings, and other crap. We set to work sanding down all of the walls and rafters.
We painted the interior of the house a light grey; a change from the sour yellow it was.
All of the rafters were painted white. We then had a number of feature walls; in the main bedroom we put up red striped wallpaper, in the living area we painted a burnt orange and in the bathroom we painted sky blue. As well as this I decided I wanted to paint a mural.

Burnt Orange feature wall in the dining room
Red and grey striped wall paper feature
wall in the bedroom


Blue feature wall in the bathroom


I set to work measuring the front bathroom wall. This was the best spot for it as it doesn't initially stand out, yet as you sit on the loo you can contemplate the artwork. Next I designed a simple layered image of a rock concert out of various silhouettes I found online. I chose a colour scheme that stood out and I printed the image. That was the easy part.
My final design which combines several silhouettes in to a concert,
made using MS paint.
The idea was a performer and
a crowd with some crazy lights
emmiting from the guitar.


Next I set to work with a measuring tape measuring out all of the points on the image to the wall. I drew the entire image on the wall in pencil and then I put brush to wall and began to add colour.
We got creative with the paint
The blank wall


An attempted splice so you can see the whole wall
Masking tape to guide the purple lines


This corner detail shows that several layers of the yellow
was needed to be effective.


What happened over the next few weeks was an amazing transformation of lifeless wall space into a colourful static performance. Each night when I had a break from my studies I would paint a little. As more colour made its way onto the wall the mural came to life!

There are still parts of the mural which I'd like to touch up, for instance, the masking tape around the heater has been there for years now but I'm no rush to take it off; there's also a spot that doesn't line up perfectly but I'm probably the only one who notices it as I look at it each day.
Putting my feet up, it doesn't all have to be about work.
It has come to the stage where we are soon to move out of our little house on the hill, but no word has been said as to the fate of the mural. Fingers crossed it survives. I like to believe I've added value to the house rather than reduced value.

My completely imperfect Rockstar mural.

Thursday, 28 January 2016

Emergency Response Kit's

This post is an edited version of a previous post. It started as an urgent plea for help, now I want to use it to share an awesome story and message.

Between Wednesday the 27 of Jan and Sunday the 31 of Jan I took part in RYLA, the Rotary Youth Leadership Award; a leadership course for young people aged between 18 and 24.

One of our challenges was to be the group to raise the most money over a two hour period, the money would go towards an Emergency Response Kit or E.R.K.


Below is the original post
___________________________________________
"
WE HAVE 2 HOURS ONLY!!!

I am taking part as one of seven partaking in the Rotary Youth Leadership Awards from January 27-31.
Rotary NZ has developed and produced Emergency Response Kits (ERKs) to provide essential supplies to emergency effected households in the Pacific.


We in New Zealand are the first response to the Pacific when they are hit by Natural disasters. Rotary provided and delivered 900 to Fiji in 2012 and about the same to Samoa in 2009.

One Emergency Response Kit contains the tools to construct a basic shelter, find food from the land and sea, to allow people to cook and clothe themselves. The empty plastic containers can hold 90L of water. There are 60+ Items.

One E.R.K. costs $600 and we have until 2.35pm to raise as much funds and awareness for these E.R.K.'s as we possibly can so help out team PINK and donate to help out so we can prepare to help those people in need!
Even $1 counts! Sharing this post helps too!

You can donate through the following link:
rnzwcs.org/donate

You can donate via bank transfer or through the Give-a-little page.
PLEASE put the following in your comment:

RYLA 2016 ERK TEAMPINK

Thank you so much for helping towards a great cause!
"
___________________________________________

After making this post my group split off into different parts of Wellington city to raise money any way possible; one of my team members Moni and myself teamed up and went to some workplaces where they sent an email around to all employees. We then found a spot on Cuba St where we based ourselves asking for help from the public in the form of donations and also sharing with them our cause.

What happened next changed my view of people. We had many people who would walk past in a hurry, giving you the cold  shoulder. There were people who would say no and continue on with their day. There were people who would ignore you completely, not willing to spare the time just to say no.
Then there were the others. There was an incredible outpouring of generosity from all sorts of different people. Some of them would search the bottom of their wallets for any shrapnel they had, some would quite willingly give a $5, $10, or $20 dollar note. I approached one man who was a beneficiary who spent his evenings in a night shelter for the homeless, he gave me a dollar.
A lot of people honestly had no money to give, but would stop and talk to us; two Fijian ladies asked for more information in the form of an email address and a donations website so that they could then share with their Fijian social group our cause and see if anyone there would donate. One man had no coin to spare but was busy taking photos of the city. He took our photo and gave us his card, we then sent him some information about our cause and he in turn sent us the photo.


This was a very hard challenge for me to do as I absolutely hate asking people for money, but I really appreciated the diversity of people that I encountered. Whether or not they donated or not I appreciated that most people were willing to listen to me.

The E.R.K.'s are an awesome tool. By preparing them in a warehouse in NZ ready to deploy if a disaster does occur somewhere in the pacific we can be ready straight away to help out our pacific island neighbours. New Zealand is a nation of power and responsibility. It is our responsibility to help our neighbours in a crisis.
The link is still live; you can still donate, so if you have a few dollars to spare please thinking of sharing it with this cause. Thank you.
rnzwcs.org/donate